robcarync
Sliders
- Location
- Raleigh, NC
There is already a how to on re-indexing the torsion bars, which is correct, but I aim to fill in some gaps as far as why this needs to be done and what is happening at a conceptual level, and answer some commonly asked questions. I hope I am not stepping on anyone's toes by covering the same material. The original How To is found:
http://www.clubxterra.org/forums/showthread.php?t=2554
I really try to go into the conceptual level of what is going on here, assuming little to no knowledge of a torsion bar suspension system. There is a LOT to read, but there are also a LOT of questions asked on this topic.
Prerequisites
I am a firm believer in the philosophy of not doing anything to your car unless you truly understand what it is you are doing. That is why I am often times longwinded and over think things at times. That is also why I have these prerequisites that I suggest you understand before you touch a wrench to your torsion bar adjusters.
Before going into the actual process of re-indexing, or re-phasing, an Xterra torsion bar, you really need to understand how these things works on a conceptual level. This how to article is written to completely encompass everything involved with adjusting the torsion bars on a first gen Xterra independent front suspension.
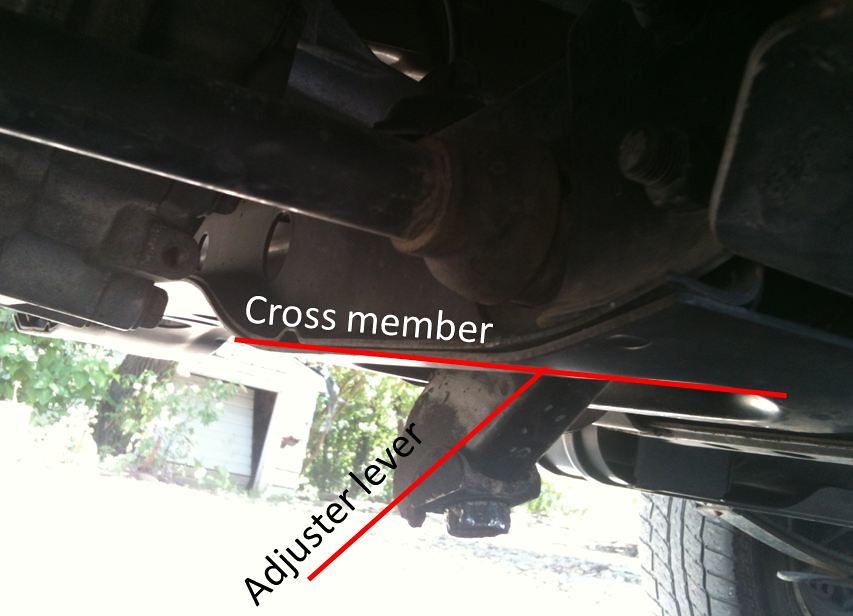
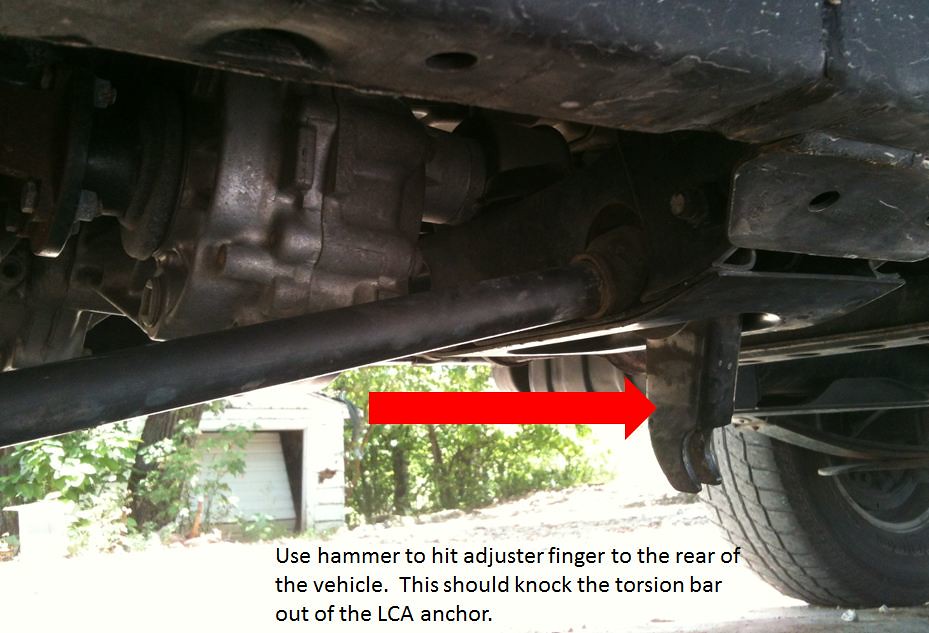
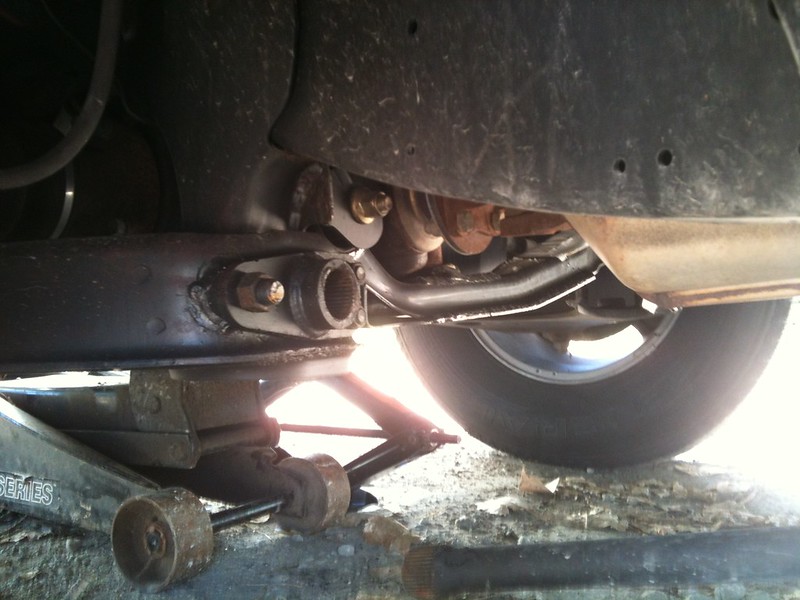
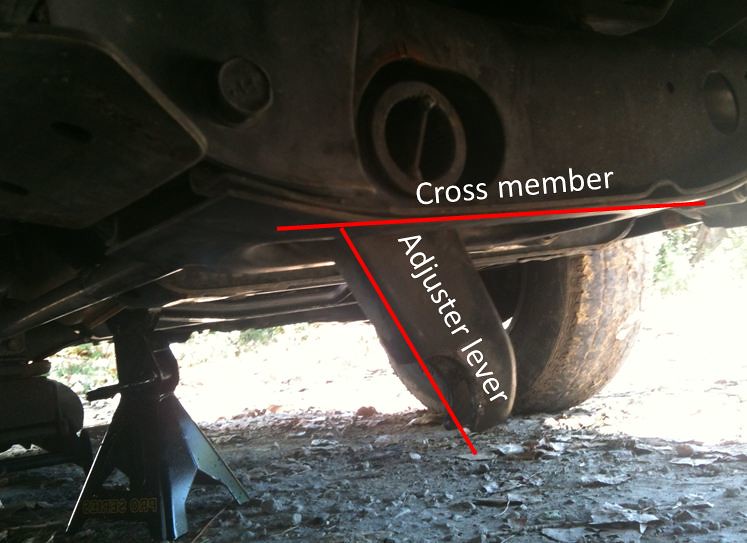
Firstly, the torsion bar is located under the car and runs from the lower control arm (LCA) under the front tire all the way to a cross member, which is located near the rear of the front doors. A torsion bar is a steel bar with splines on the ends, which is anchored into the lower control arm on the front, and an adjuster lever inside the cross member. Both of these anchors stick out to the sides in opposite directions, which act as a lever arm. The following diagram shows the overall schematic and location of the torsion bar’s function.
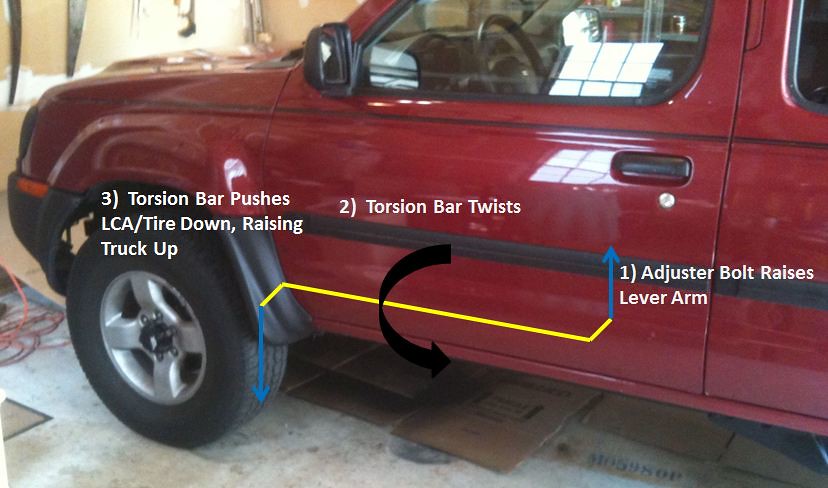
Now, a torsion bar is a spring. Most people think of a spring as a standard coil spring…you push down on it, it pushes straight back at you. A standard coil spring has a direct relationship with how far it is compressed. For instance, if you push down 1 inch, the spring pushes back with 5 pounds force. A torsion bar uses the inherent stiffness of the material to resist motion. Instead of a linear distance, a torsion bar has an angular displacement and a resulting torque. The same direct relationship applies for a torsion bar. For instance, if you twist the bar by 1 degree, the bar twists back with 5 foot pounds of torque. (Force displacement numbers are made up)
What is the point of this? When you adjust your torsion bars, you are NOT TIGHTENING the bar. The bar will have the same angular displacement because it is holding up the same amount of weight! You may crank the adjuster bolt upwards into the cross member, but the result is the lower control arm mount is pointed down, which lowers the tire and raises your ride height. This results in the same internal force in the bar, and the same angular displacement or twist in the bar. Adjusting your torsion bars will not stiffen the front suspension. The ride quality will not be changed, except for needing an alignment and the possibility of hitting the bump stops on the upper control arms (UCA).
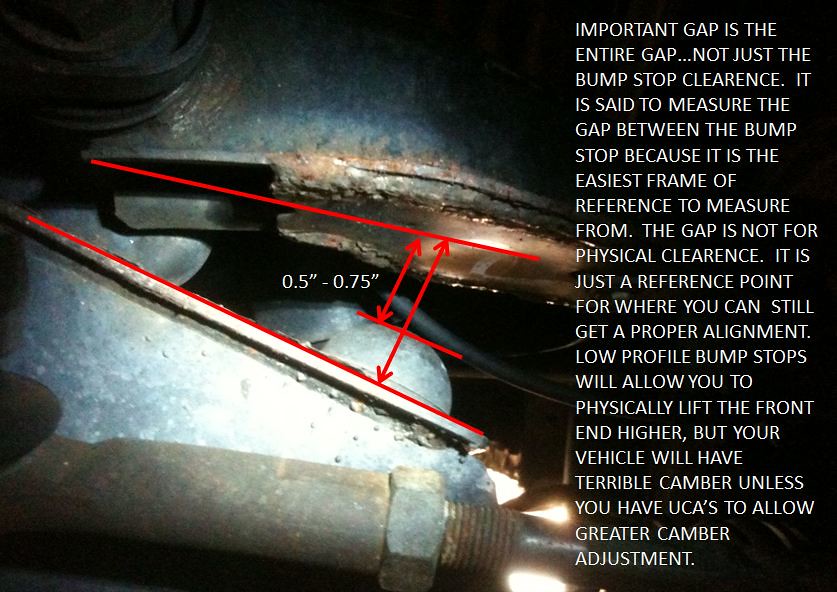
Now, let’s take a look at the bump stops in the front. The UCA will hit this black rubber dome bump stop when the tire droops too low (or the frame bounces too high). Whenever you are adjusting ride height, you need to ensure that you have at least 0.5 inch gap. It is important to note that the physical gap is not what is important. The bump stop is just the easiest place to measure. The issue is with aligning the front tires. If the control arms are too low, or ride height too high, the tires can’t be properly aligned. This means that low profile bump stops can help improve tire droop, but raising the suspension further will compromise your alignment and tire wear.
Secondly, if the bump stop gap is too small, or nonexistent, the ride quality will be quite harsh. Now wait a minute you may say…The UCA contacts the bump stop when the tire droops down...doesn’t that mean the car would be off the ground for it to hit the bump stop? Not necessarily. It all goes back to the concept of a spring. When you push a spring down and let it go, it does not simply go back to the original free position. It snaps back and forth until a damping force will resist this motion. That is where your shock comes in, but no vehicle vibration will be perfectly damped; there will always be a little bit of back and forth motion. So if you hit a bump in the road, and your tire snaps upwards, the torsion bar snaps it back down. Depending on how good your shocks are, the UCA will travel below the original ride height or static position and can hit this bump stop. It may not lift the car off the ground, but it is something you can feel.
Moral of the story: Always leave at least 0.5 inch gap between your UCAs and your stock bump stop, even if you have aftermarket UCAs or low profile bump stops. Your tires and passengers will thank you. Even with re-indexing, you must always stop lifting once you have a 0.5 inch gap, measured at the stock bump stop.
Introduction to Re-Indexing
Re-indexing your torsion bars is the process of removing the torsion bar from at least one of the anchors, rotating the bars position in the anchor either direction (typically 1-4 splines), and reinstalling. This process changes the position of the adjuster finger for a specific ride height.
This process is used to solve two specific situations:
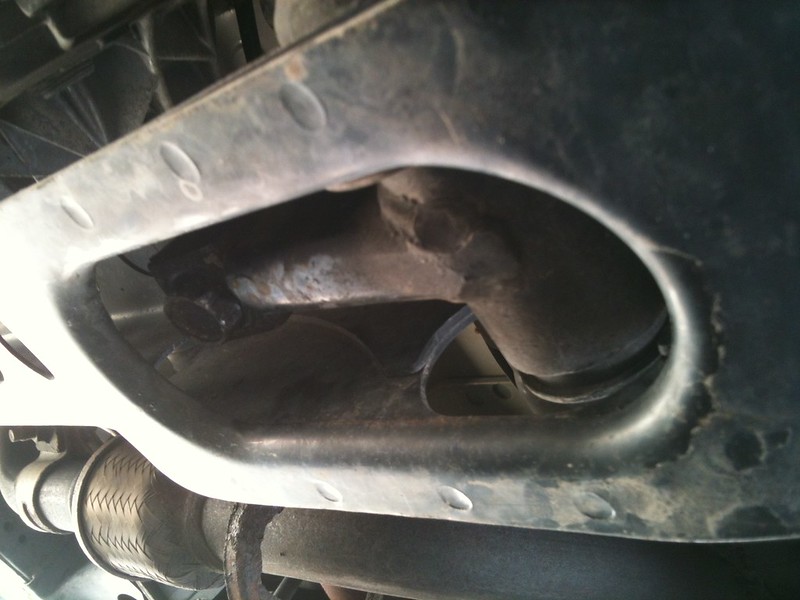
1) You have more than 0.5 inches between your stock bump stop and your UCA, you want to raise your adjuster, but the adjuster lever is too deep in the cross member and can’t go any further. You need to remove the adjuster bolt, remove the torsion bar from one of the anchors, and rotate the bar so the adjuster lever is further away from the cross member. This allows the adjuster more room to lift the vehicle.
2) You are at your desired ride height, you have your correct bump stop gap, but your adjuster is hanging down below the cross member. You need to remove the adjuster bolt, remove the torsion bar from one of the anchors, and rotate the bar so the adjuster lever is closer to the cross member. This will allow the adjuster lever to be inside the cross member when you readjust to your desired ride height.
http://www.clubxterra.org/forums/showthread.php?t=2554
I really try to go into the conceptual level of what is going on here, assuming little to no knowledge of a torsion bar suspension system. There is a LOT to read, but there are also a LOT of questions asked on this topic.
Prerequisites
I am a firm believer in the philosophy of not doing anything to your car unless you truly understand what it is you are doing. That is why I am often times longwinded and over think things at times. That is also why I have these prerequisites that I suggest you understand before you touch a wrench to your torsion bar adjusters.
Before going into the actual process of re-indexing, or re-phasing, an Xterra torsion bar, you really need to understand how these things works on a conceptual level. This how to article is written to completely encompass everything involved with adjusting the torsion bars on a first gen Xterra independent front suspension.
Firstly, the torsion bar is located under the car and runs from the lower control arm (LCA) under the front tire all the way to a cross member, which is located near the rear of the front doors. A torsion bar is a steel bar with splines on the ends, which is anchored into the lower control arm on the front, and an adjuster lever inside the cross member. Both of these anchors stick out to the sides in opposite directions, which act as a lever arm. The following diagram shows the overall schematic and location of the torsion bar’s function.
Now, a torsion bar is a spring. Most people think of a spring as a standard coil spring…you push down on it, it pushes straight back at you. A standard coil spring has a direct relationship with how far it is compressed. For instance, if you push down 1 inch, the spring pushes back with 5 pounds force. A torsion bar uses the inherent stiffness of the material to resist motion. Instead of a linear distance, a torsion bar has an angular displacement and a resulting torque. The same direct relationship applies for a torsion bar. For instance, if you twist the bar by 1 degree, the bar twists back with 5 foot pounds of torque. (Force displacement numbers are made up)
What is the point of this? When you adjust your torsion bars, you are NOT TIGHTENING the bar. The bar will have the same angular displacement because it is holding up the same amount of weight! You may crank the adjuster bolt upwards into the cross member, but the result is the lower control arm mount is pointed down, which lowers the tire and raises your ride height. This results in the same internal force in the bar, and the same angular displacement or twist in the bar. Adjusting your torsion bars will not stiffen the front suspension. The ride quality will not be changed, except for needing an alignment and the possibility of hitting the bump stops on the upper control arms (UCA).
Now, let’s take a look at the bump stops in the front. The UCA will hit this black rubber dome bump stop when the tire droops too low (or the frame bounces too high). Whenever you are adjusting ride height, you need to ensure that you have at least 0.5 inch gap. It is important to note that the physical gap is not what is important. The bump stop is just the easiest place to measure. The issue is with aligning the front tires. If the control arms are too low, or ride height too high, the tires can’t be properly aligned. This means that low profile bump stops can help improve tire droop, but raising the suspension further will compromise your alignment and tire wear.
Secondly, if the bump stop gap is too small, or nonexistent, the ride quality will be quite harsh. Now wait a minute you may say…The UCA contacts the bump stop when the tire droops down...doesn’t that mean the car would be off the ground for it to hit the bump stop? Not necessarily. It all goes back to the concept of a spring. When you push a spring down and let it go, it does not simply go back to the original free position. It snaps back and forth until a damping force will resist this motion. That is where your shock comes in, but no vehicle vibration will be perfectly damped; there will always be a little bit of back and forth motion. So if you hit a bump in the road, and your tire snaps upwards, the torsion bar snaps it back down. Depending on how good your shocks are, the UCA will travel below the original ride height or static position and can hit this bump stop. It may not lift the car off the ground, but it is something you can feel.
Moral of the story: Always leave at least 0.5 inch gap between your UCAs and your stock bump stop, even if you have aftermarket UCAs or low profile bump stops. Your tires and passengers will thank you. Even with re-indexing, you must always stop lifting once you have a 0.5 inch gap, measured at the stock bump stop.
Introduction to Re-Indexing
Re-indexing your torsion bars is the process of removing the torsion bar from at least one of the anchors, rotating the bars position in the anchor either direction (typically 1-4 splines), and reinstalling. This process changes the position of the adjuster finger for a specific ride height.
This process is used to solve two specific situations:
1) You have more than 0.5 inches between your stock bump stop and your UCA, you want to raise your adjuster, but the adjuster lever is too deep in the cross member and can’t go any further. You need to remove the adjuster bolt, remove the torsion bar from one of the anchors, and rotate the bar so the adjuster lever is further away from the cross member. This allows the adjuster more room to lift the vehicle.
2) You are at your desired ride height, you have your correct bump stop gap, but your adjuster is hanging down below the cross member. You need to remove the adjuster bolt, remove the torsion bar from one of the anchors, and rotate the bar so the adjuster lever is closer to the cross member. This will allow the adjuster lever to be inside the cross member when you readjust to your desired ride height.
Last edited by a moderator: