
Cptpackrat
Bumpers Installed
- Location
- Gillette WY
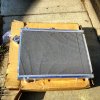
I had tossed the idea of installing an R34 radiator into my 2001 Xterra. After doing some research I had found that the R32/R34 radiator with passenger side inlet and outlet. Both inlet and outlet are 34mm
I found this one on ebay for $135
http://www.ebay.com/itm/180995934236?_trksid=p2057872.m2749.l2649&ssPageName=STRK:MEBIDX:IT
After receiving the radiator I did some measuring and found that the bottom pins of the radiator were exactly the same as OEM. I then found that the upper pins were more narrow than the OEM so at this point I knew that I would have to make a custom upper mount plate. (more on this later)
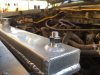
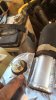
Here you can see the thickness of the radiator's upper tank
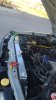
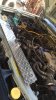
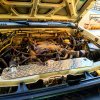
After removing the OEM radiator I just simply dropped the new R34 radiator into place while making sure the lower pins drop into the bushings down low.
The hoses SHOULD all line up without much effort. (my upper hose was modified to fit my water temp gauge sensor)
The next thing was to make an upper mounting plate. Here is where things get a little vague as this was done for my application and I'm not sure how things vary between vehicles.
I started off with threading the upper pins to 3/8" NF and threading as far down as I possibly could.
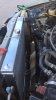
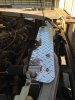
I started off with a 28"x6" sheet of Aluminum diamond plate however you can make it from whatever type or material you would like. I then cut the plate to 26" on the rear and left the front of the plate to 28" making a slightly trapezoid shaped plate. I then found where I needed to drill the holes for the pins, I also notched out the center of the plate for the filler neck.
I then made my own rubber washers to fit on the top and bottom of the plate, these measure 1.25" with a 3/8" center hole. Also in this picture you can see where I notched the plate to fit the upper radiator hose inlet.
At this point I started to clean things up, I cleaned the edges up and rounded them out, I drilled the hole for the hood holder rod clip, and smoothed out all the burred up edges.
I opted not to contour the plate to the upper radiator crossmember, however it would be an easy thing to do.
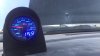
And what is the benefit of doing the R34 radiator over the SC drop in you ask? Well after 30 minutes of idling in 75* my temps were hovering between 168*-173*
After 20-30minutes of highway driving in 85* ambient temps, followed by 5 minutes of stationary idling the highest temp I had seen was 183*
I hope you enjoy this writeup and hope that you chose this option to replace your OEM single row!
Also, I have an AT so an external transmission cooler will be need to be added in, I chose 2x Torqflo 12"x5.5"
I found this one on ebay for $135
http://www.ebay.com/itm/180995934236?_trksid=p2057872.m2749.l2649&ssPageName=STRK:MEBIDX:IT
After receiving the radiator I did some measuring and found that the bottom pins of the radiator were exactly the same as OEM. I then found that the upper pins were more narrow than the OEM so at this point I knew that I would have to make a custom upper mount plate. (more on this later)
Here you can see the thickness of the radiator's upper tank
After removing the OEM radiator I just simply dropped the new R34 radiator into place while making sure the lower pins drop into the bushings down low.
The hoses SHOULD all line up without much effort. (my upper hose was modified to fit my water temp gauge sensor)
The next thing was to make an upper mounting plate. Here is where things get a little vague as this was done for my application and I'm not sure how things vary between vehicles.
I started off with threading the upper pins to 3/8" NF and threading as far down as I possibly could.
I started off with a 28"x6" sheet of Aluminum diamond plate however you can make it from whatever type or material you would like. I then cut the plate to 26" on the rear and left the front of the plate to 28" making a slightly trapezoid shaped plate. I then found where I needed to drill the holes for the pins, I also notched out the center of the plate for the filler neck.
I then made my own rubber washers to fit on the top and bottom of the plate, these measure 1.25" with a 3/8" center hole. Also in this picture you can see where I notched the plate to fit the upper radiator hose inlet.
At this point I started to clean things up, I cleaned the edges up and rounded them out, I drilled the hole for the hood holder rod clip, and smoothed out all the burred up edges.
I opted not to contour the plate to the upper radiator crossmember, however it would be an easy thing to do.
And what is the benefit of doing the R34 radiator over the SC drop in you ask? Well after 30 minutes of idling in 75* my temps were hovering between 168*-173*
After 20-30minutes of highway driving in 85* ambient temps, followed by 5 minutes of stationary idling the highest temp I had seen was 183*
I hope you enjoy this writeup and hope that you chose this option to replace your OEM single row!
Also, I have an AT so an external transmission cooler will be need to be added in, I chose 2x Torqflo 12"x5.5"
Attachments
-
 IMG_3256.JPG3.2 MB · Views: 179
 -
 IMG_3263.JPG463.3 KB · Views: 200
 -
 IMG_3264.JPG521.5 KB · Views: 200
 -
 IMG_3266.JPG400.3 KB · Views: 185
 -
 IMG_3269.JPG565.4 KB · Views: 195
 -
 IMG_3270.JPG860.4 KB · Views: 200
 -
 IMG_3274.JPG1 MB · Views: 195
 -
 IMG_3276.JPG2.1 MB · Views: 189
 -
 IMG_3277.JPG484.2 KB · Views: 188
 -
 IMG_3278.JPG644.7 KB · Views: 162
Last edited:

