
- Location
- Rochester, NY
Ok so i figured i would just put together a thread about how you can put together your own bumper with a swing out carrier for much less money and effort than you think. I am by no means a skilled fabricator or anything, and i just used basic tools you would have in a garage. This isn't really something for everyone, but i couldn't justify paying 800 or whatever for a new bumper, so i wanted to make my own. This isn't to dis any of the companies that make bumpers for Xterra's, they make some great stuff from what I've seen, and if i had the cash i might have taken that route as well.My dad was a big part in this project, and has built bumpers/rock sliders in the past. I want to thank Silver Dude, M3C.CA, and Xtacular for their help in answering a lot of questions i had! Ok…so on to the info
Tools:
Grinder (lots grinding disks and cut-off wheels)
Welder (i used a Century stick welder, did the job fine)
Welding rods, gloves, helmet (obviously)
80 grit sanding blocks
200 grit sandpaper
Drill- used a drill press for most of the drilling but a bosch high-speed drill also came in handy for of a lot of other drilling too
circular file
tape measure
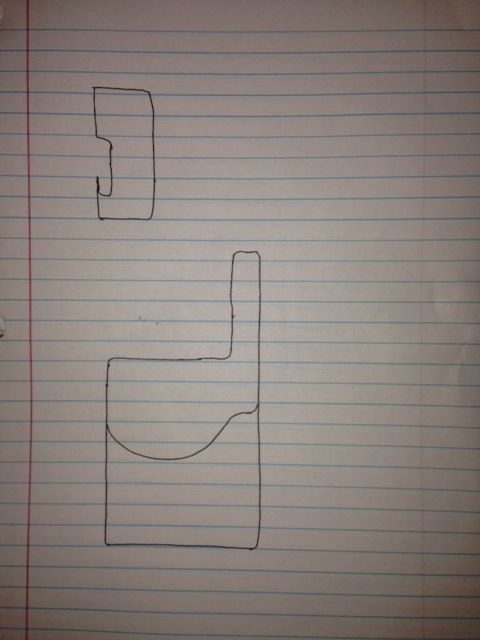
Measurements/drawings
My drawings aren't great, but i did the best i could, let me know if anything needs clarification
Bumper dimensions and shackle and hitch location
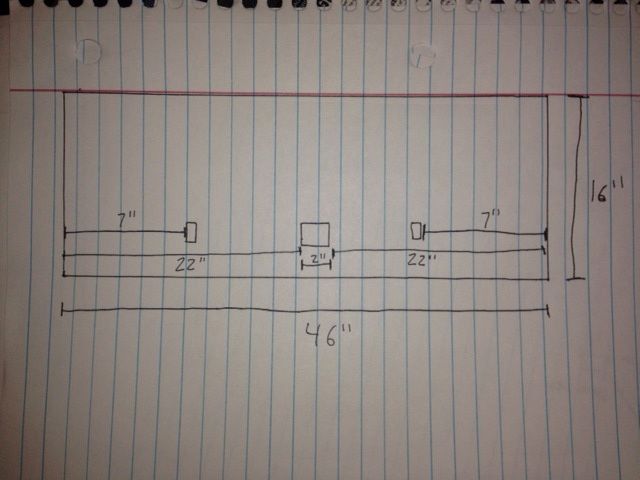
Bumper bends and heights. Took all of these based on the bumper corners to get accurate and tight fit
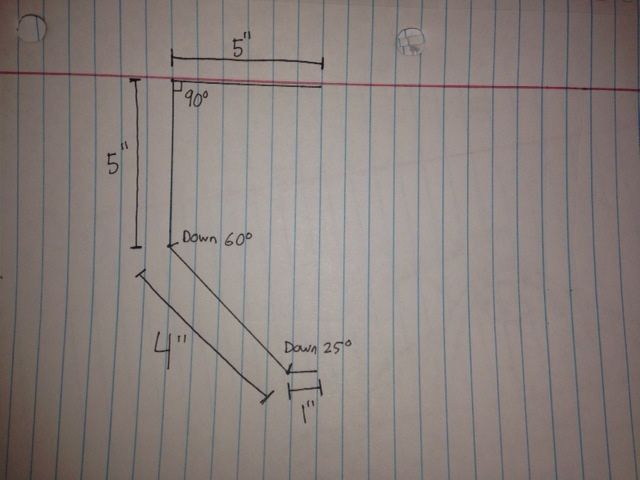
Backside of bumper dimensions/layout
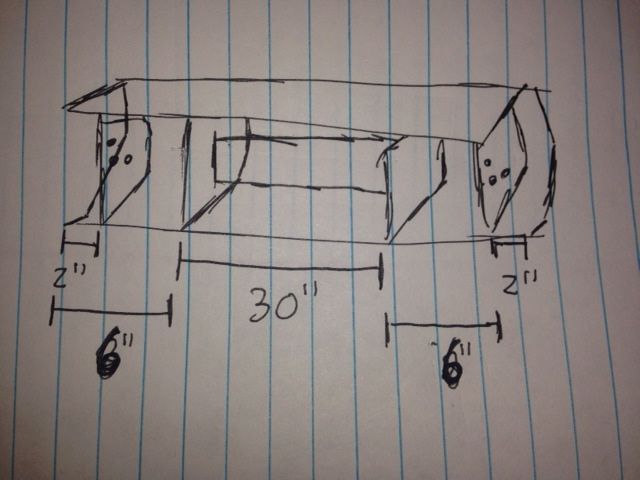
Swing Arm
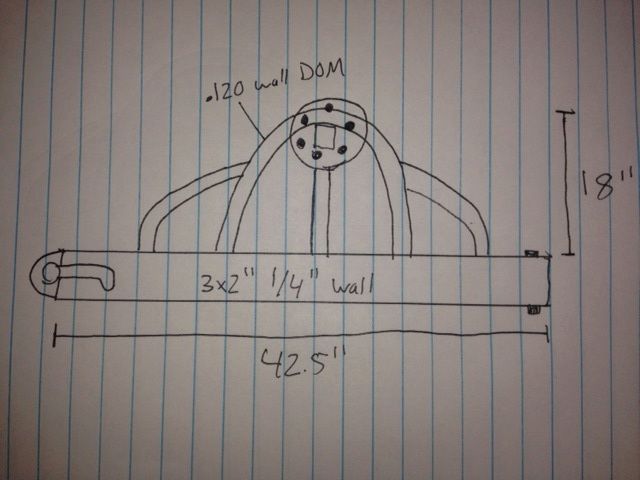
Latch Catch
Materials:
Swing Arm:
Affordable off-road pre runner 1 3/4" .120 wall 18" tall hoop (for tire carrier hoop)http://www.affordableoffroad.com42" 3x2 steel 1/4" wall
16" 2x2 steel 1/4" wall
2 curved pieces for Hi-Lift (mine were just some leftover pieces i had, not sure on bend angles, it is 1 3/4" tubing)
1 Circular steel plate (found mine at metal scrap yard, 3/8" thick)
6 M12x1.25 Wheel studs
1 3/4" 7" long grade 8 bolt
2 3/4" ID 1" OD bronze flange bearings
1 Tire Carrier Latch (bought it from the seller separately, made for a JK bumper) http://www.ebay.com/itm/2007-2013-J...es&fits=Make:Jeep&hash=item3385d3e54c&vxp=mtr
Bumper:
46x16" 3/16" steel plate (had it bent to specs by a local metal shop using a brake press)
2 1/4" thick mounting brackets (cut to contour inside of bumper)
2 1/4" thick structural plates (cut same size and shape as mounting brackets)
30" 1/4" thick C-Channel
Swing Arm Hinge:
2 3/8" thick rear leaf spring shackle mounts (the two i bought were slightly different and actually would have bolted right up on an Xterra)
http://www.affordableoffroad.com/in...category_id=8&option=com_virtuemart&Itemid=15
Process:
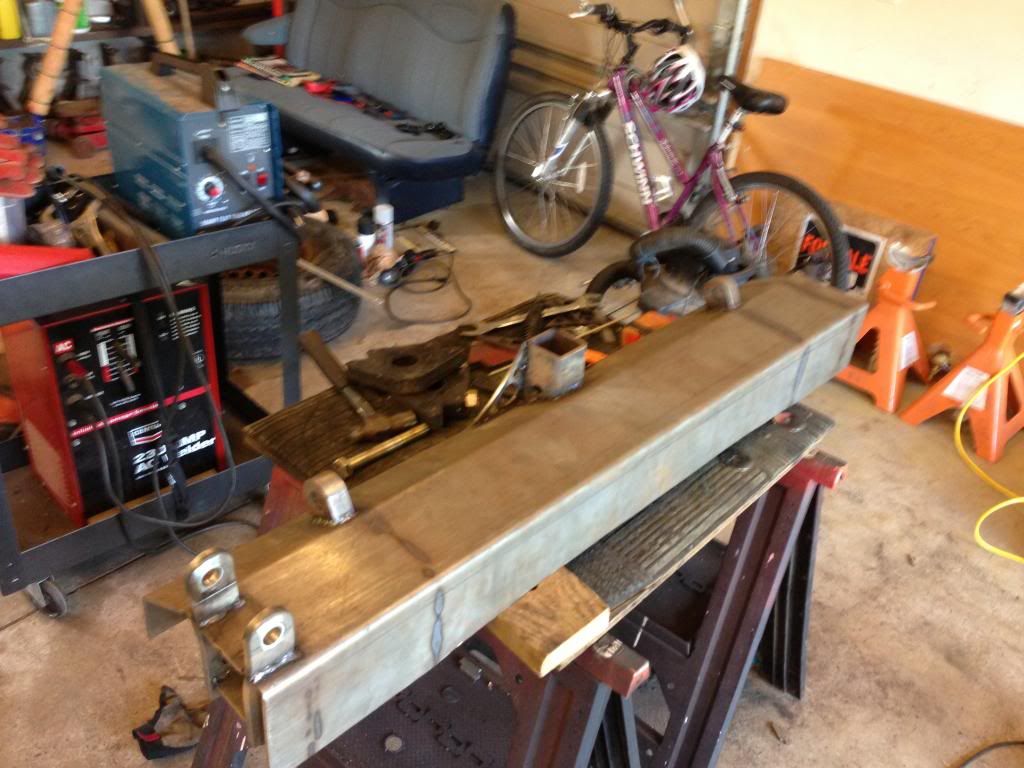
1. Started with piece of steel for the main part that i had bent to my specs/measurements, and began making the mounting brackets. This was really simple, all i did was traced the inner contour of the bumper onto the steel plate and cut and grinded it until it fit perfectly. Did this for all 4 mounting/structural pieces and welded them in.
2. welded in the 30" piece of C-Channel in between structural brackets. This piece makes the whole bumper really strong and eliminates bumper flex i feel like.
Test fit…
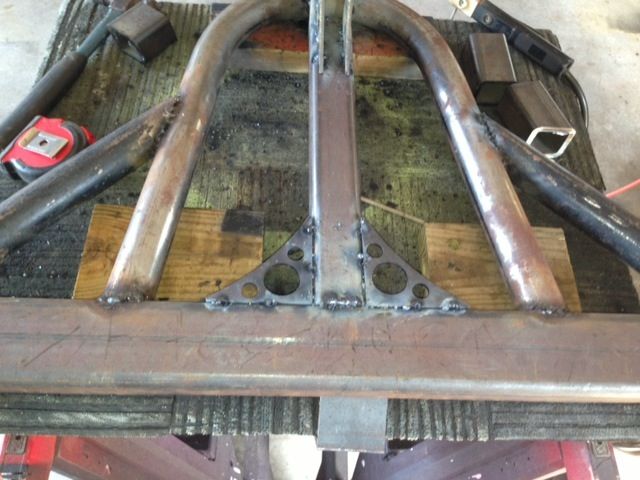
3. Cut holes in bumper face for Hitch and Clevis mounts, pretty self explanatory and simple. Welded the clevis mounts onto the structural pieces, and hitch onto the C-Channel
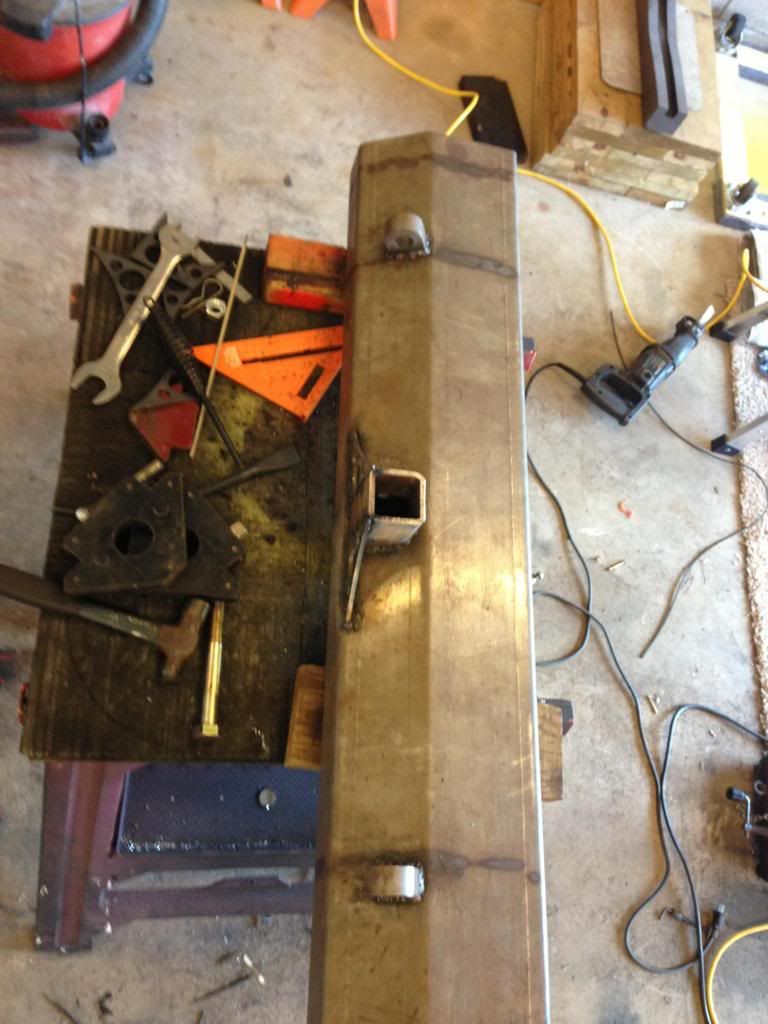
4. Cut slits in end of bumper to slide the leaf spring shackle mounts, set them to desired spacing from bumper and welded them onto mounting bracket, with a small piece of c-channel separating the shackle mounts for added strength. Also added a few affordable off road gussets to the hitch for added strength.
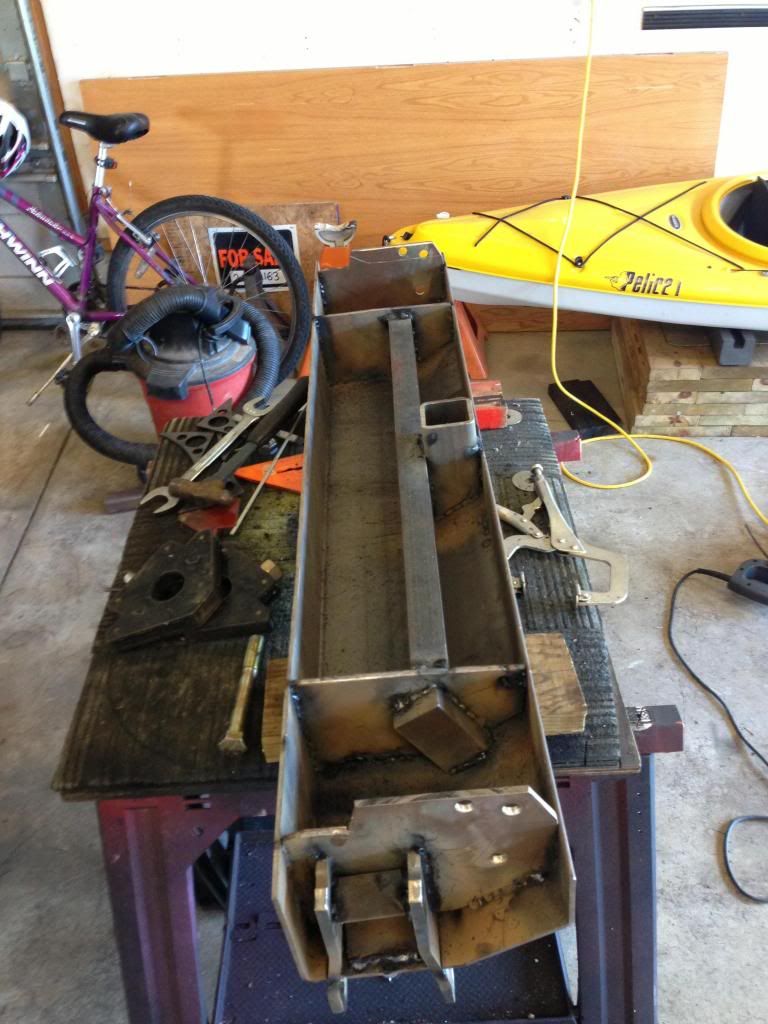
After all of these steps i had this:
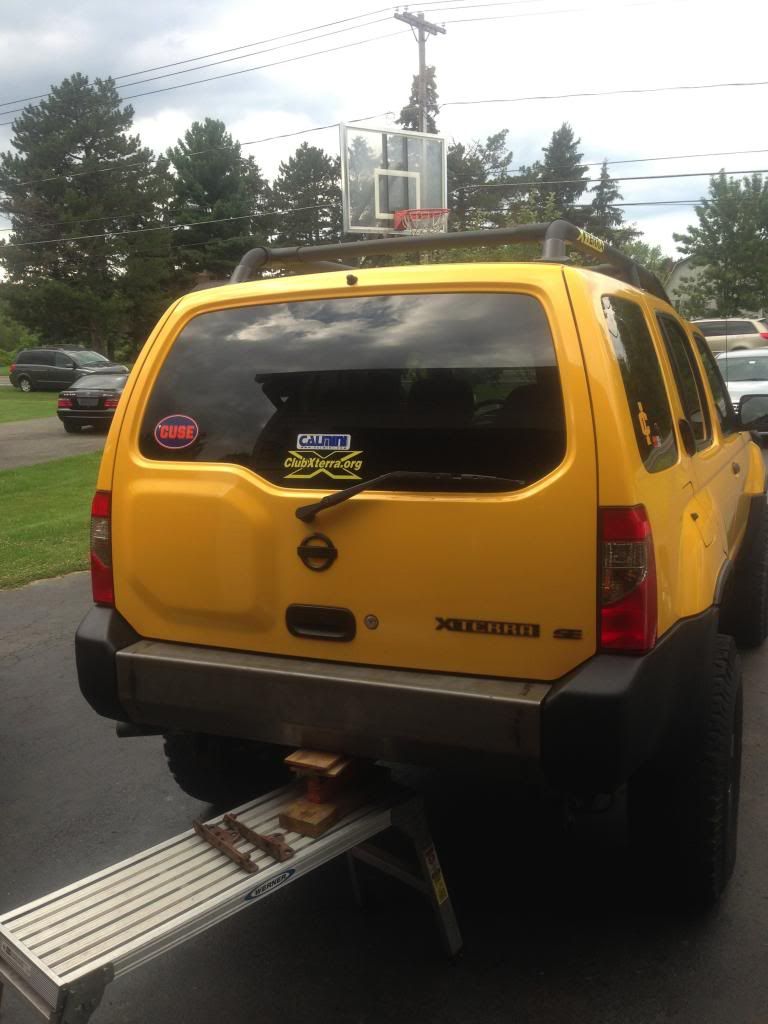
Here is that same progress painted and installed.
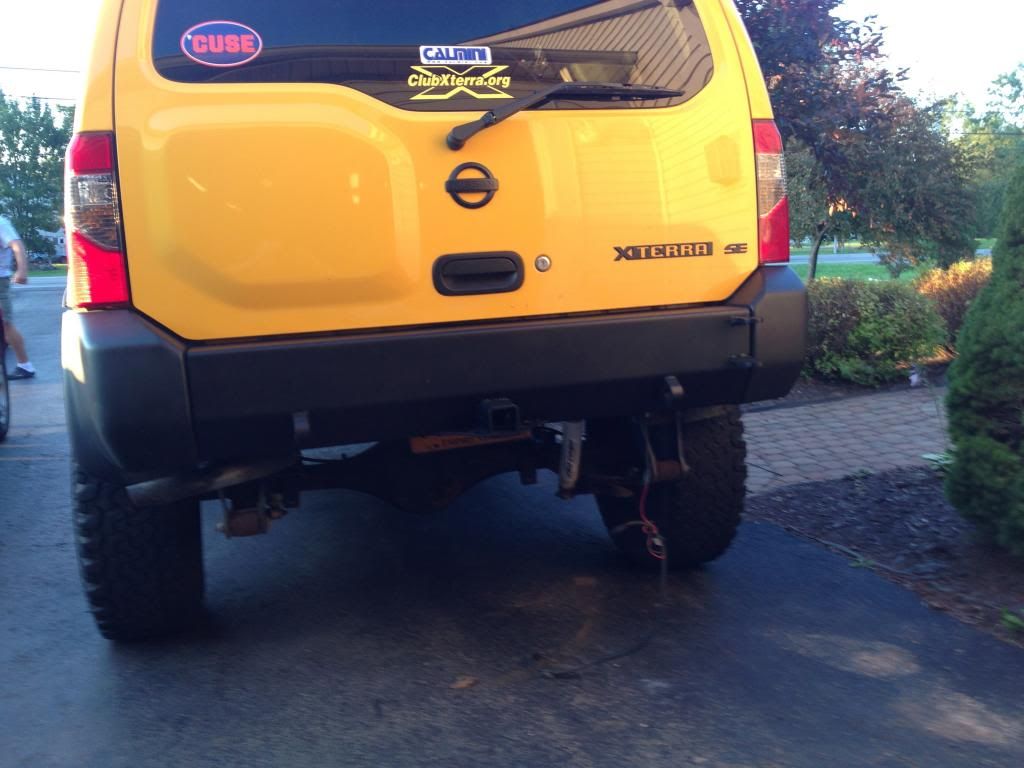
Essentially i could have been done here, and skipped making a hinge mount for a swing arm, but the whole purpose of this bumper build in my mind was to be able to mount a tire and hi-lift on the bumper, so more fab…
Swing-Arm:
This took easily twice as long to do than the bumper itself. It took a ton of planning and asking questions. i knew i wanted to add my own flair to some otherwise common designs, so i changed up a few things from the norm.
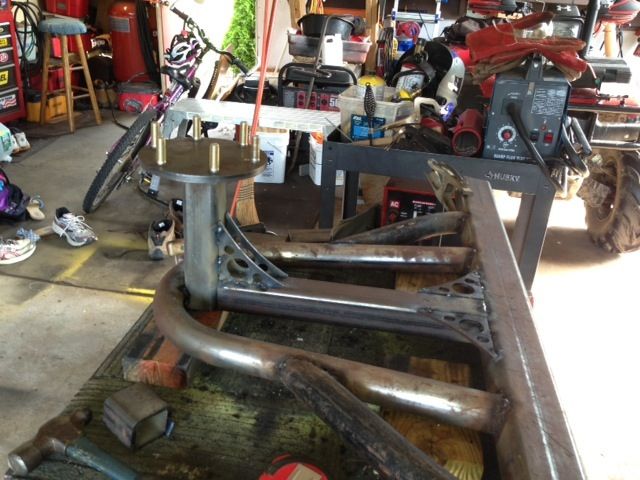
1. So i basically just started with a long piece of 3x2, and just started adding from there. First i drilled a 1" hole in one end for the bolt for the attachment point. next, i set the angle i wanted on the hoop for the sing arm and tacked it in place. Once i liked the angle that the tire would sit at i finished the welds.
2. I knew i wanted a horizontal Hi-Lift mount, so i just found an old pre runner hoop my dad didn't want from his last bumper build and cut it in half to make little supports on either side of the hoop. These add strength to it, and gave me a place to mount my Hi-Lift. Welded those in place at same angle as the hoop
3. Cut a 9" piece of 2x2 and welded it flush with the backside of the hoop at the top of it.
4. Then cut a 15 1/4" piece of 2x2 and welded it from the swing arm up to the bottom of the 2x2 i welded in step 3
5. Drilled 6x5.5 bolt pattern holes in circular plate, and welded it to the 9" long 2x2 piece
6. Added some more gussets to the piece of 2x2 in the center and on the 2x2 that holds the tire
7. Put in some 3/4 ID 1" OD Bronze flange bearings for the arm to ride on.
 At this point the swing arm itself was essentially done, other than the latch…
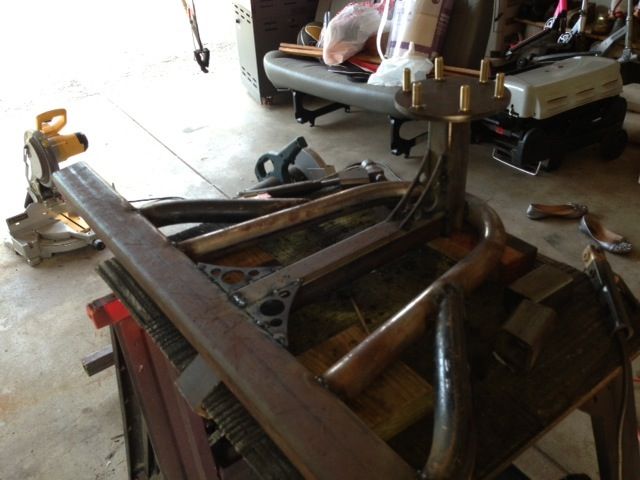
Not all of the welds were done yet, but you get the idea..
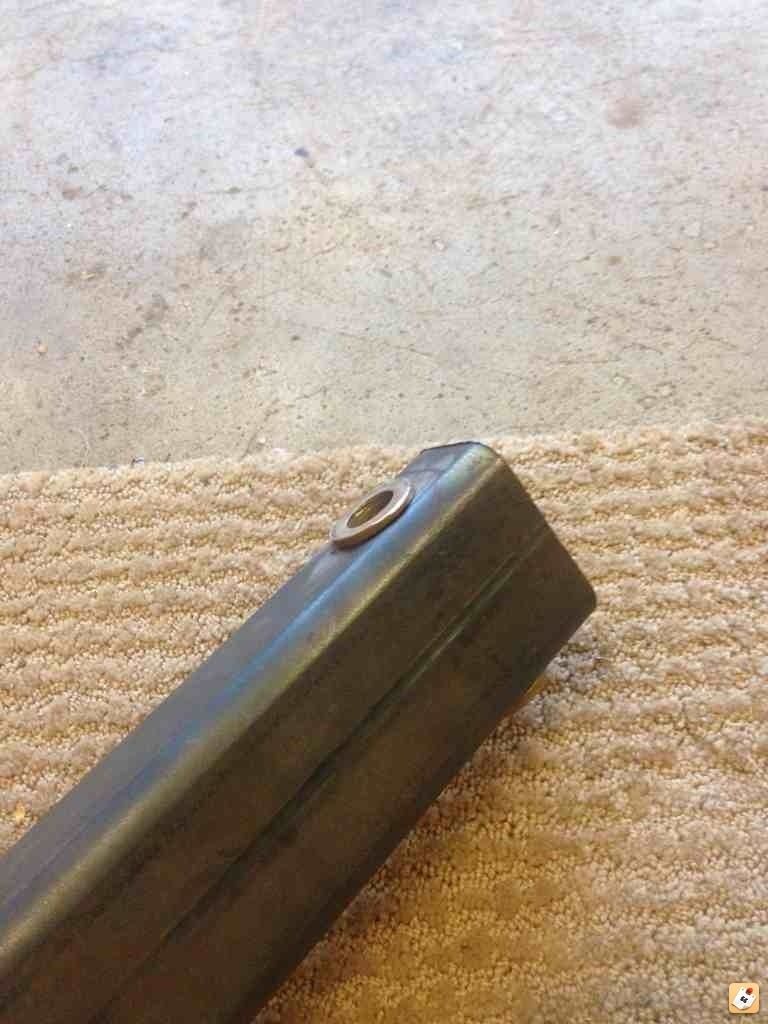
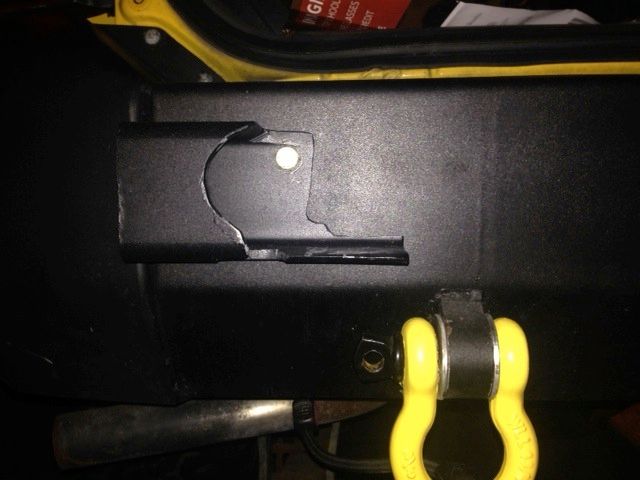
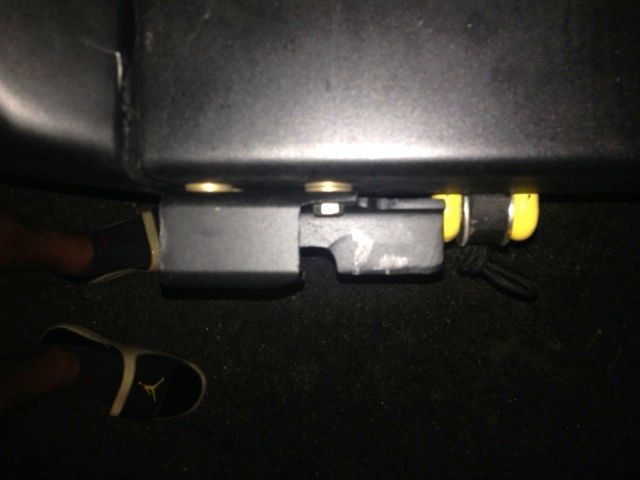
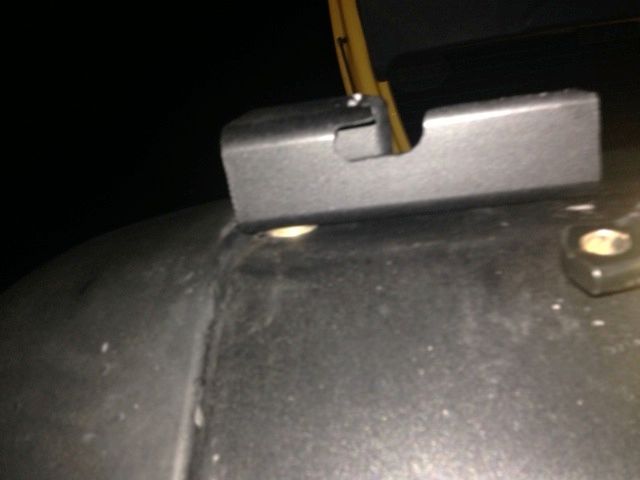
Latch and Latch-catch:
There are a ton of options for latches (hitch pins, t-handles, De-Sta-Co clamps) just to name a few. But again i wanted to do something different, so i went with a handle from a JK tire carrier. It took a lot more work to make the it work and to fab a latch catch to work in conjunction. These were the only things left to do on the bumper when i left for school in august. My dad finished them both up for me and did a great job. The inside of the latch slides into the 3x2, but isn't made for 1/4" wall 3x2, so it took a lot work to get it to fit. It simply just bolts in there. The Latch catch took a lot of planning, and according to my dad over 3 days of work. A ton of filing, and test fitting, but the mechanism works flawlessly now and sort of lock into place. Ive driven down the freeway many times since its been done and there is not rattling at all or issues with the latch.
Here are some pics of the latch catch...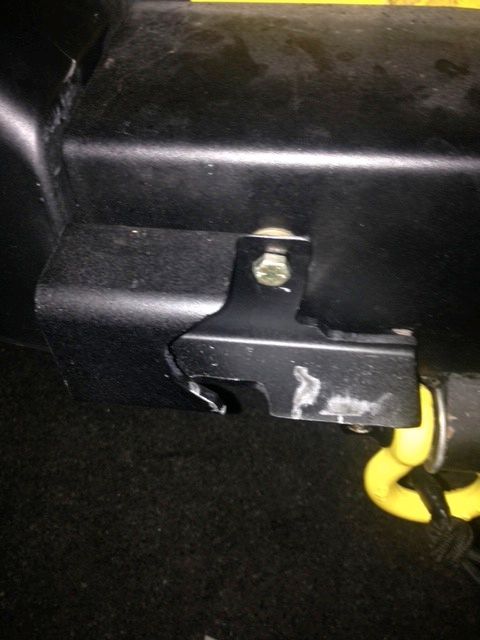
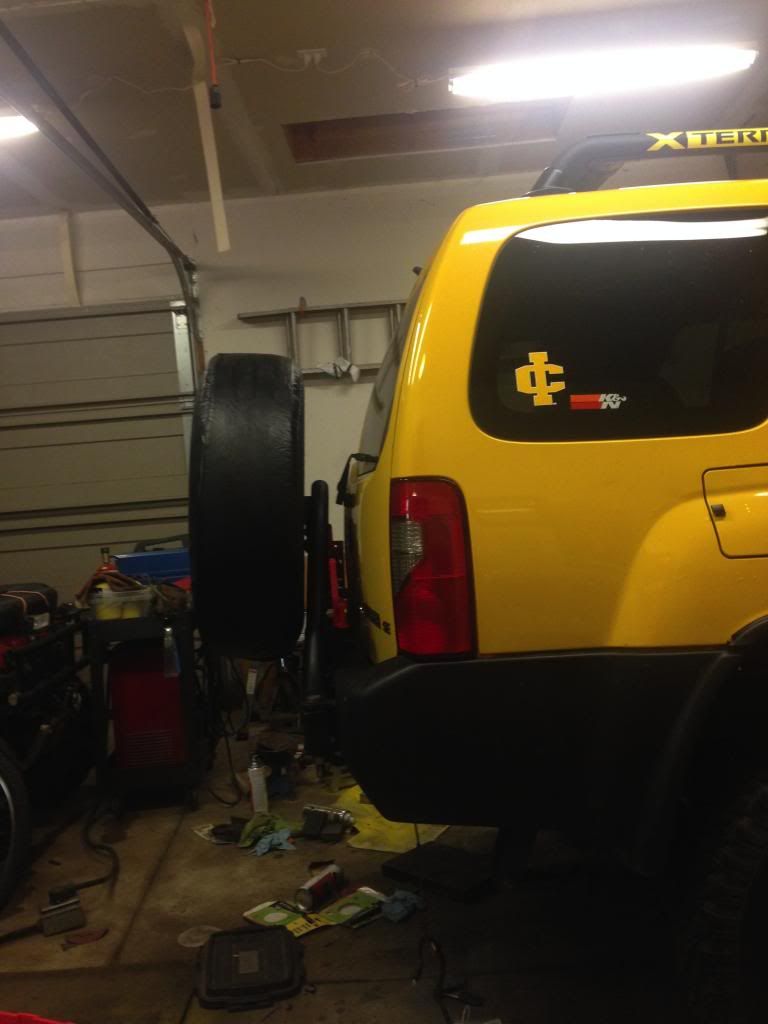
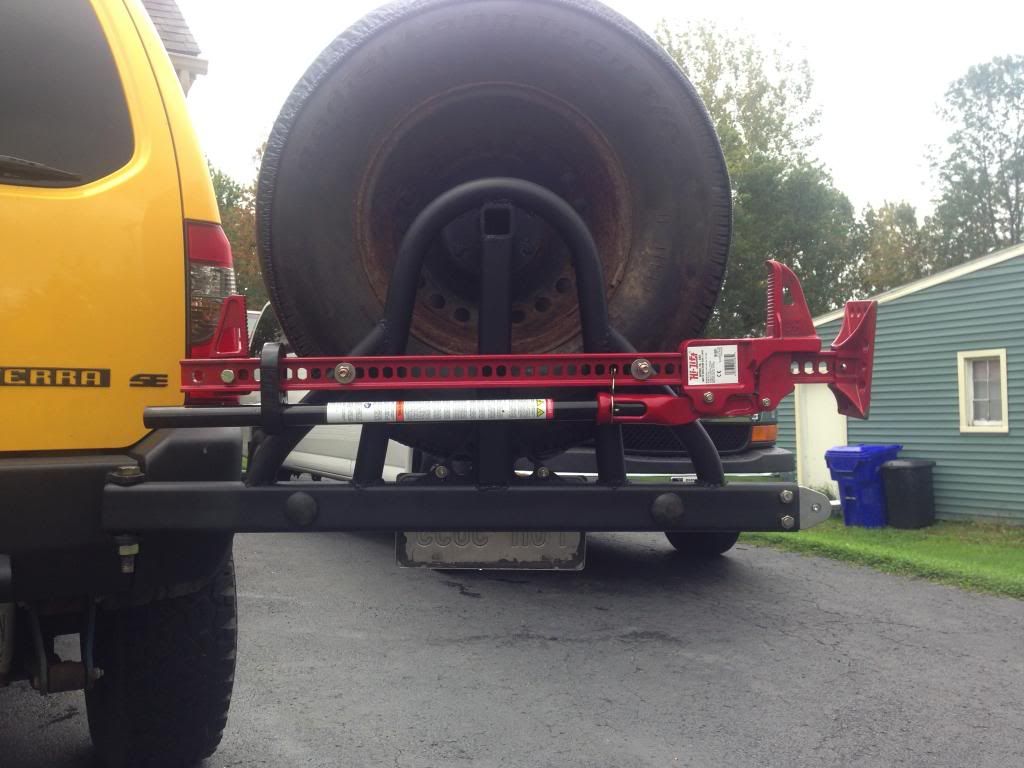
So that is basically the whole process from start to finish other than painting. Total cost is always something that comes up in projects like these, and i don't really feel like breaking down each part individually, but all in all i spent ~350 in materials to build the bumper, and probably something like 30 hours of work on it. Anyway..Here are some finished pics of it, let me know if you have any questions!!
 [/URL[URL=http://s1138.photobucket.com/user/yellowx16/media/Image3_zpsc56e09a5.jpg.html]

Tools:
Grinder (lots grinding disks and cut-off wheels)
Welder (i used a Century stick welder, did the job fine)
Welding rods, gloves, helmet (obviously)
80 grit sanding blocks
200 grit sandpaper
Drill- used a drill press for most of the drilling but a bosch high-speed drill also came in handy for of a lot of other drilling too
circular file
tape measure
Measurements/drawings
My drawings aren't great, but i did the best i could, let me know if anything needs clarification
Bumper dimensions and shackle and hitch location

Bumper bends and heights. Took all of these based on the bumper corners to get accurate and tight fit

Backside of bumper dimensions/layout

Swing Arm

Latch Catch

Materials:
Swing Arm:
Affordable off-road pre runner 1 3/4" .120 wall 18" tall hoop (for tire carrier hoop)http://www.affordableoffroad.com42" 3x2 steel 1/4" wall
16" 2x2 steel 1/4" wall
2 curved pieces for Hi-Lift (mine were just some leftover pieces i had, not sure on bend angles, it is 1 3/4" tubing)
1 Circular steel plate (found mine at metal scrap yard, 3/8" thick)
6 M12x1.25 Wheel studs
1 3/4" 7" long grade 8 bolt
2 3/4" ID 1" OD bronze flange bearings
1 Tire Carrier Latch (bought it from the seller separately, made for a JK bumper) http://www.ebay.com/itm/2007-2013-J...es&fits=Make:Jeep&hash=item3385d3e54c&vxp=mtr
Bumper:
46x16" 3/16" steel plate (had it bent to specs by a local metal shop using a brake press)
2 1/4" thick mounting brackets (cut to contour inside of bumper)
2 1/4" thick structural plates (cut same size and shape as mounting brackets)
30" 1/4" thick C-Channel
Swing Arm Hinge:
2 3/8" thick rear leaf spring shackle mounts (the two i bought were slightly different and actually would have bolted right up on an Xterra)
http://www.affordableoffroad.com/in...category_id=8&option=com_virtuemart&Itemid=15
Process:
1. Started with piece of steel for the main part that i had bent to my specs/measurements, and began making the mounting brackets. This was really simple, all i did was traced the inner contour of the bumper onto the steel plate and cut and grinded it until it fit perfectly. Did this for all 4 mounting/structural pieces and welded them in.
2. welded in the 30" piece of C-Channel in between structural brackets. This piece makes the whole bumper really strong and eliminates bumper flex i feel like.
Test fit…


3. Cut holes in bumper face for Hitch and Clevis mounts, pretty self explanatory and simple. Welded the clevis mounts onto the structural pieces, and hitch onto the C-Channel
4. Cut slits in end of bumper to slide the leaf spring shackle mounts, set them to desired spacing from bumper and welded them onto mounting bracket, with a small piece of c-channel separating the shackle mounts for added strength. Also added a few affordable off road gussets to the hitch for added strength.
After all of these steps i had this:


Here is that same progress painted and installed.

Essentially i could have been done here, and skipped making a hinge mount for a swing arm, but the whole purpose of this bumper build in my mind was to be able to mount a tire and hi-lift on the bumper, so more fab…
Swing-Arm:
This took easily twice as long to do than the bumper itself. It took a ton of planning and asking questions. i knew i wanted to add my own flair to some otherwise common designs, so i changed up a few things from the norm.
1. So i basically just started with a long piece of 3x2, and just started adding from there. First i drilled a 1" hole in one end for the bolt for the attachment point. next, i set the angle i wanted on the hoop for the sing arm and tacked it in place. Once i liked the angle that the tire would sit at i finished the welds.
2. I knew i wanted a horizontal Hi-Lift mount, so i just found an old pre runner hoop my dad didn't want from his last bumper build and cut it in half to make little supports on either side of the hoop. These add strength to it, and gave me a place to mount my Hi-Lift. Welded those in place at same angle as the hoop
3. Cut a 9" piece of 2x2 and welded it flush with the backside of the hoop at the top of it.
4. Then cut a 15 1/4" piece of 2x2 and welded it from the swing arm up to the bottom of the 2x2 i welded in step 3
5. Drilled 6x5.5 bolt pattern holes in circular plate, and welded it to the 9" long 2x2 piece
6. Added some more gussets to the piece of 2x2 in the center and on the 2x2 that holds the tire
7. Put in some 3/4 ID 1" OD Bronze flange bearings for the arm to ride on.
 At this point the swing arm itself was essentially done, other than the latch…


Not all of the welds were done yet, but you get the idea..
Latch and Latch-catch:
There are a ton of options for latches (hitch pins, t-handles, De-Sta-Co clamps) just to name a few. But again i wanted to do something different, so i went with a handle from a JK tire carrier. It took a lot more work to make the it work and to fab a latch catch to work in conjunction. These were the only things left to do on the bumper when i left for school in august. My dad finished them both up for me and did a great job. The inside of the latch slides into the 3x2, but isn't made for 1/4" wall 3x2, so it took a lot work to get it to fit. It simply just bolts in there. The Latch catch took a lot of planning, and according to my dad over 3 days of work. A ton of filing, and test fitting, but the mechanism works flawlessly now and sort of lock into place. Ive driven down the freeway many times since its been done and there is not rattling at all or issues with the latch.
Here are some pics of the latch catch...


So that is basically the whole process from start to finish other than painting. Total cost is always something that comes up in projects like these, and i don't really feel like breaking down each part individually, but all in all i spent ~350 in materials to build the bumper, and probably something like 30 hours of work on it. Anyway..Here are some finished pics of it, let me know if you have any questions!!

 [/URL[URL=http://s1138.photobucket.com/user/yellowx16/media/Image3_zpsc56e09a5.jpg.html]

Last edited:
")