Rooftop LED Bar

TwistedGrin

Test Drive
Location
76182
Esteemed Xterra Nation,

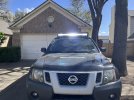
I sold my used 2000SE at 168K miles with a dripping main seal, failed driver side window, intermittent door lock failures......the motor was running fine. Purchased a 2010X (plain as water with no map light) with 86K miles. I changed all fluids, separated Trans radiator from water radiator. The truck runs perfect after replacing failed cam position sensors.....ready for the next 80K miles from current odometer 121K miles. (Figuring to sell off at 200K miles)

I was researching used car pricings contemplating selling off for a used FJC or 4Runner......discovered (Using 100K miles left to reach End of Life scenario) the Xterra 2nd generation is about $7-10K less purchase price than the FJC/4Runners. (ie: 165K odometer mile FJC/4Runner @ $19,000.00 vrs 125K mile Xterra @$11,000.00) regardless of year model.

I currently put about 5700miles on the X.....so should be good for another 10years (80K miles) to reach 180K odometer miles.

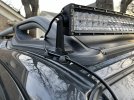
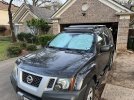
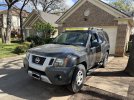
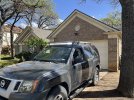
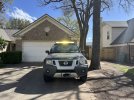
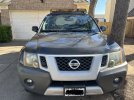
I chose to keep the 2010X with my custom retro-fitted radio, custom stock position aftermarket speakers, trailer hitch, rearview back up mirror, fog lights with replacement indicator lever, new shocks and struts, running boards..........and install a 40inch Curved Double Row LED Rooftop Lightbar. (My neighbors just purchased new vehicles so I need to keep pace - LOL)

Should I expect wind noises from the Lightbar and how long can these lightbars last?

Thanks in advance - comments welcome.....I'll post photos as soon as the Lightbar is deployed.

TwistedGrin
Keep the X - Keep the cash
 
Last edited:

TwistedGrin

Test Drive
Location
76182
The lightbar delivered yesterday......took me about 4hours to get it completed.....mostly due to studying and trying out different options on the fly.

Comments: REgarding Extreme LED Lightbar and kit for 2010 Xterra-X
1. Super easy to install and highly recommend the pre-made wiring harness - however there is no instruction sheet provided
2. I did contact customer service to ensure 100% clarity of the Red/White/Black wiring connection to the Rocker Switch
3. My Roof Airdam bolts came out smoothly ...I had pre-soaked with penatrating oil 24hrs in advance - advise Xterra owners to be very careful with the roof bolts
4. The 2010 Xterra has an opening with a grommet just below the break booster in firewall - perfect for the switch harness to pass through
5. The 2010 Xterra has (3) covered openings for switches on the driver side knee panel.....it needs opening up with a rasp or reamer for proper fitment of the Rocker switch
6. The wiring harness switch (small) connectors need to be replaced with larger receivers to attach onto the Rocker Switch
7. This Xterra has the fuse box on the passenger side facing the door.....thus requires a wire pull from a power source of the fuse box in order to integrate the driver side Rocker Switch with the lights/dimmer power....I chose not to complete this
8. The Lightbar mounts work and are functional....however they do hang off over the Airdam molded base......not quite a good fit - a little "Cheezy" when looking right at them.
9. I had to use M6 1x40 length hex head bolts since the brackets with rubber pad sit higher than a 30mm bolt length thread to catch
10. I used plastic .25inch loom tubing to help protect the wiring harness from passenger side engine bay battery to driver side firewall egress to the rocker switch....and zip tie of course
11. I think it is very important to fill the Xterra Airdam base holes with Silicon and use some BLUE locktite on the bolts
12. I am bringing my wire back down to the engine bay from the roof along the passenger side windscreen using KC rubber strip for 100% external installation.....the KC rubber strip delivers tomorrow
13. The pre-fab wiring harness has weather protected connector at the lightbar with a 2ft pigtail.....I chose to zip tie connection and additional wiring to the backside flat brace section of the Airdam looping back to the side in order to bring the wiring harness down the side of the windshield......this "Should" work as my Xterra is Dark Silver nearly black.
14. I used a fuse box mounting screw next to the battery to fasten down the wiring harness relay block and used a ground in the inside fender adjacent to the corner of the battery. This keeps everything in same area and fairly neat.
15. There is excess wiring loom from the short run down the windshield....I'll simply ziptie the bundle and secure it to a fuse box cover.
16. I used weather proofing electrical tape with an additional wrap of standard electrical tape on the light switch connector that wound up right at the brake booster.....I'll also wrap the lightbar connecter that is ziptied to the backside Airdam.
17. The Lightbar does indeed give the X a new look.....perhaps a little in your face over the top audacity - LOL
18. I am noticing some wind noise and vibration at 45mph either from the light bar or buffeting onto the Airdam....but I expected this up front.
19. As others have stated at night - the light bar is offensively bright....the entire windscreen is 1950's camera flash bright white light.....but the 100yard forward view is painted as good or better than a Boeing 747 landing gear light.....this will be put to test driving East Texas dark dank canopy covered twisty roads very soon.
20. I do have "some" concern of accidently hitting the rocker arm in daytime traffic.....but then again I rarely have a hand in that area and the X has plenty of leg room .....so this concern will probably be mitigated in a couple of miles driving.
21. The Rocker arm LED indicator is on full time.....not sure if I like this and how long will it last....only the shadow knows.
22. The installation is meant to be removable should I decide to trade up for a newer X......can easily re-deploy again to another X

It's a lightbar with a truck attached to it.

TwistedGrin
 

Attachments

  • IMG_2057.JPG
    IMG_2057.JPG
    1.7 MB · Views: 7
  • IMG_2059.JPG
    IMG_2059.JPG
    1.8 MB · Views: 5
  • IMG_2061.JPG
    IMG_2061.JPG
    1.6 MB · Views: 5
  • IMG_2062.JPG
    IMG_2062.JPG
    2 MB · Views: 5
  • IMG_2063.JPG
    IMG_2063.JPG
    2.2 MB · Views: 5
  • IMG_2064.JPG
    IMG_2064.JPG
    4.2 MB · Views: 6
  • IMG_2065.JPG
    IMG_2065.JPG
    4.4 MB · Views: 6
  • IMG_2066.JPG
    IMG_2066.JPG
    4.2 MB · Views: 6
  • 50%.jpg
    50%.jpg
    422.9 KB · Views: 7
  • IMG_2068 50%.jpg
    IMG_2068 50%.jpg
    1.7 MB · Views: 8
Last edited:

TwistedGrin

Test Drive
Location
76182
Fortunately .....my Lightbar does not resonate or Windscream ......however it does in fact howl when I clip on the amber lens covers.....adjusting the angle of the lightbar at 90degrees flat on the wind did help change and perhaps reduce the windscream siren with the lenses attached......I can say with some degree of certainity......I'll probably only deploy the amber lens covers for low speed inclement night driving the back roads....also of note:

I chose to run my wiring harness externally down the passenger side of the windshield.....using spots of RTV for the underside of the wiring sheath then floated black silicone to fill in the exposed top.....you can't see the harness unless you notice the exit at the top of the windshield or the exit under the hood lip and down into the engine bay.....I did apply RTV to the top exit for a better anchor

TwistedGrin
 

Attachments

  • IMG_2106 50%.jpg
    IMG_2106 50%.jpg
    1.7 MB · Views: 3
  • IMG_2112 50%.jpg
    IMG_2112 50%.jpg
    1.7 MB · Views: 3
  • IMG_2107 50%.jpg
    IMG_2107 50%.jpg
    1.5 MB · Views: 3
  • IMG_2113 50%.jpg
    IMG_2113 50%.jpg
    1.2 MB · Views: 3
  • IMG_2120 50%.jpg
    IMG_2120 50%.jpg
    1.2 MB · Views: 3
  • IMG_2125 50%.jpg
    IMG_2125 50%.jpg
    939.8 KB · Views: 3

TwistedGrin

Test Drive
Location
76182
Like others who have reported suffering the "Light Bar sonic harmonic scream"....I too experienced the aggravating noise.

I found the fix on U-Tube and decided to give it a try.....using Automotive trim protector "Edge Trim". It's very easy to deploy.....I needed three fins covered to break the harmonic scream....the second fin from the top and the two bottom fins. Honestly you can't see it on the bar unless you study it.......$20.00 from AutoZone.

Yes....it works!!!

TwistedGrin
 

Attachments

  • IMG_2145 Edge Trim 50%.jpg
    IMG_2145 Edge Trim 50%.jpg
    1.1 MB · Views: 4
Last edited:
Top