
Bubba
Test Drive
- Location
- Menifee, CA
I was inspired to build my own sliders after reading >the sticky for this area<. Thanks for starting it CivicJoe. I read a few of the threads here and while every Xterra is different") , I thought I would share the experience. There are other designs like NOXIOUS007's Click >here< to read. Check it out. This took me roughty 60 hours whenever I had time over 6 months.
, I thought I would share the experience. There are other designs like NOXIOUS007's Click >here< to read. Check it out. This took me roughty 60 hours whenever I had time over 6 months.
DISCLAIMER – All work in this article is DANGEROUS! Always Wear the proper safety equipment and take the correct safety precations. This post strictly a count of my experience and only intended to be informational piece. Follow it at your own risk.
I built these with the help of my friend who lent me his shop and gave me a quick welding refresher. Thanks Rich!!
Cost:
$100 Scrap Metal
$50 Tools and gear
Materials:
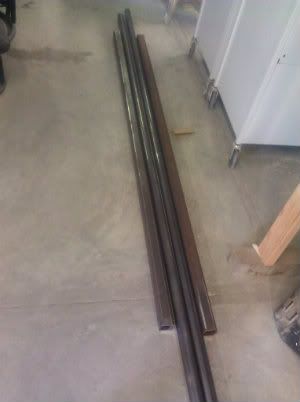
1 - 15' 2x2X1/4" Square Metal
1 - 15' 2" Diameter tubing 1/4" think
1 – 4'x6"x 5/16" Flat Metal
4 – 5x ½ " Grade 8 Bolts
8 – 2x ½ " Grade 8 Bolts
12 - Grade 8 ½ Locker Nuts
12 – gRade 8 ½ Washer
2 – cans of Dupli-Color Sprayon Bed Liner
Tools:
Chop saw with metal cutting blade
Mig Welder
Oxy-Acetylene Welder
Auto dimming Welding Mask
Half inch drill bits (6" for Drill press and 15 " for hand drill to drill into the frame)
Drill Press
Half inch Drill
Straight Grinder
Angle Grinder
3/4" crescent wrench and socket
Safety glasses (tires of crap falling in my eyes)
2 ton floor jack
2 x 2 ton floor stands
Final Measurements:
Front Mounts: 6"x12" (
Rear Mounts: 6"x6"
Support posts from mount to rail: 6 1/2"
Rail: 63"
tube: appr. 61"
Posts from rail to tube: 4"

Started with this. (not shown is the 5/16th piece of metal)
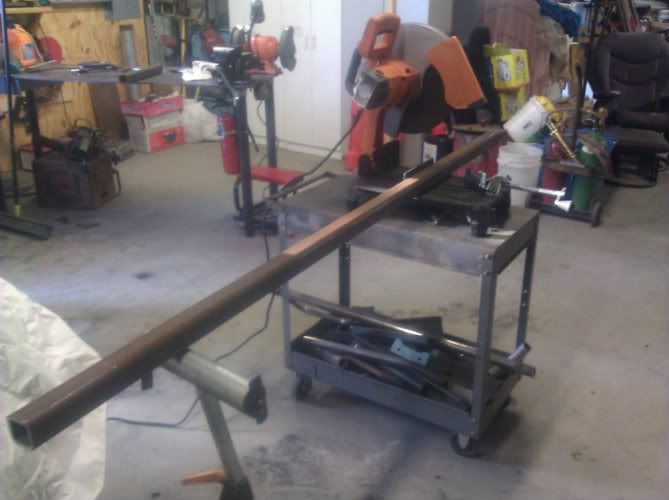
Cut the pieces to square metal to length (63")
Next. Wanted to see how how and far our we wanted the metal from the frame. (6" 5/16 from frame and 1/2 " below the body)
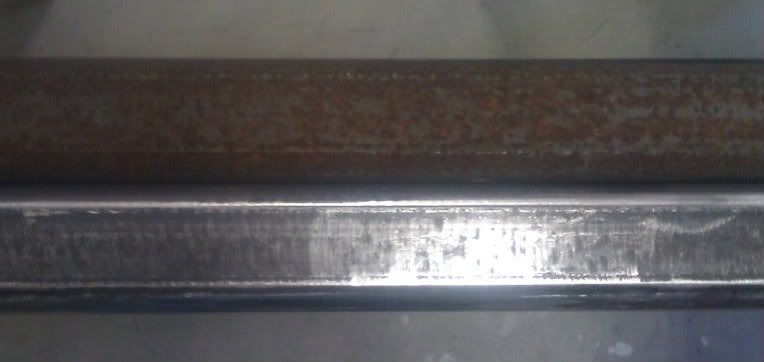
Polished the metal afterwards with a flap wheel on the angle grinder
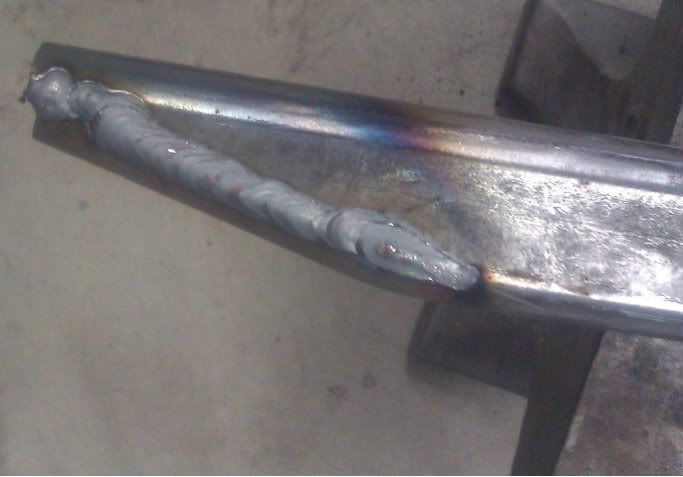
Next we tapered the ends of the metal. Cut a triangle piece out of the metal and pinched the ends together where the trianlge was then welded. We capped the end with a piece of the 5/16 metal later on. The taper was longer in the front than the back.
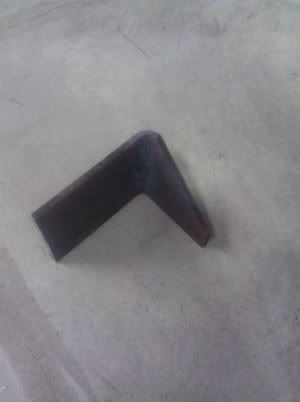
It took us little while to finally figure out where we were going to mount the sliders. For the front, we chose where a cross beam connected to the frame. For the back, we measured back roughly 50" from the front and set our sights on the large hole towards the back of the frame next to the Gas tank. I cut out the mounting brackets from the 5/16 metal for the front and the back. We clamped the front mounting brackets to the welding table, heated each, one by one with the torch and slowly bent it to 90 degree.
I mocked up where the bolts would go using a piece of transparent plastic sheet (like a lamenent sheet) shped like the mounts and used the drill press to drill the holes. We put the mounts on the frame. Raised the square metal on jacks so we could adjust the height next to the car. Once we had it right I cut the support and tacked everything together. I drilled two 1/2" holes on each side of the frame one in front and one in the back then drilled holes into the mounts. (I think in hind sight I should have drilled the additonal holes in the mount before I welded them on:squW00shy:
Finally started looking like this was going to happen. Rich bent the 2" tubing but we couldn't cut it without serioulsy messing up the angle of the area we would weld agains the square tubing. We took the pieces to Steel NutZ in Temecula an easily helped us out. Thank guys.
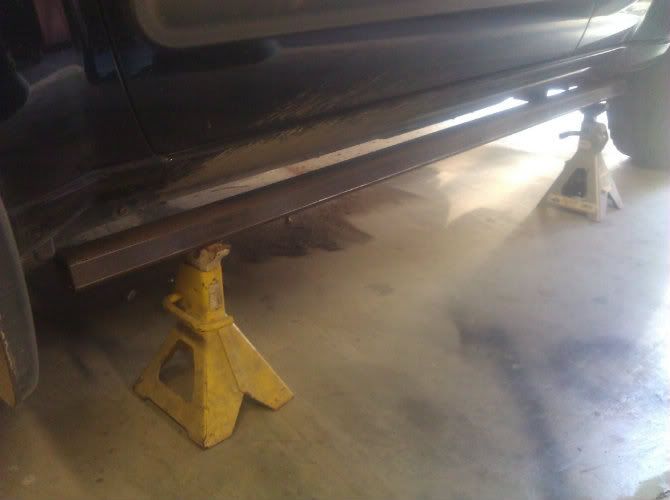
We welded the pieces on and cut the posts at 4" then with a hole saw to get them rounded to fit against the tubing. I welded and grinded my welds back out then welded and grinded that's what happens with an amateur welder. Finally got the rythm and finshed. We added angled pieces to go from the mount to the support for added strength. Then mounted them to the car.
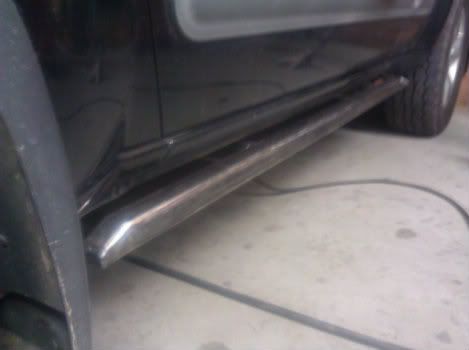
Last steps was to polish and paint. I chose to use Spray on bed liner because I couldn't afford powder coating and I cringed at the thought of slipping off smooth metal and whacking my shin on the sliders.:weep:
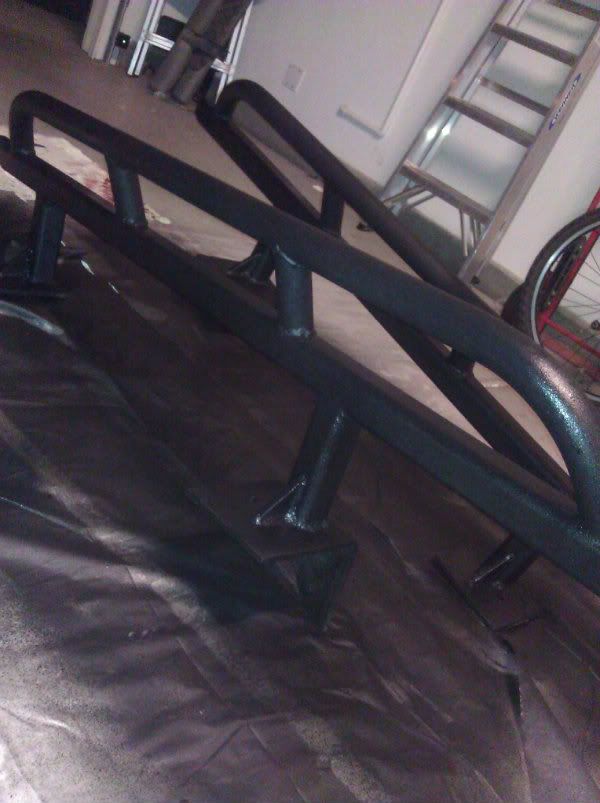
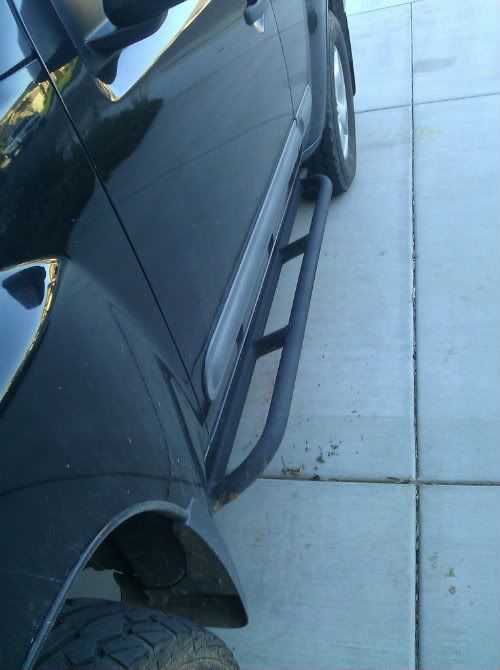
Here is the finished product.
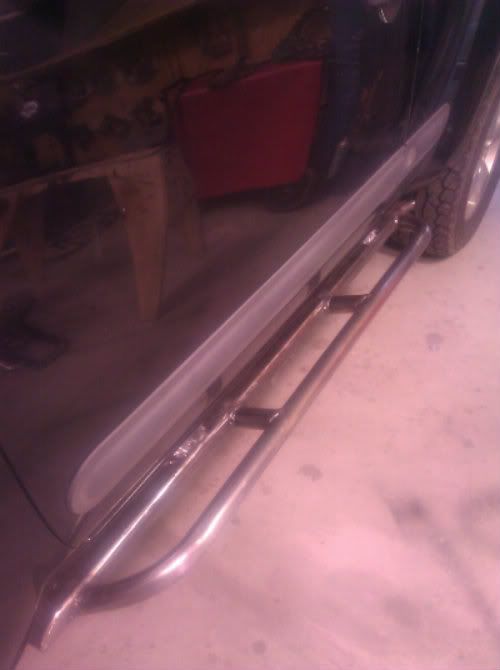
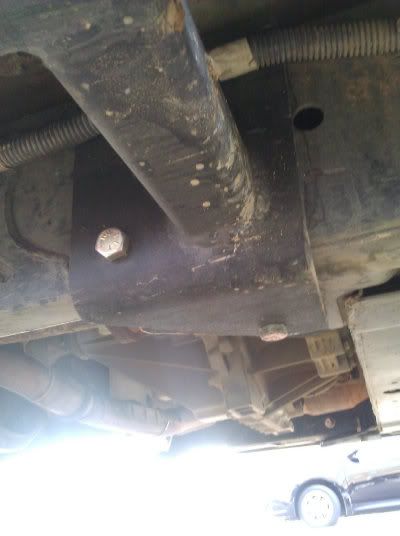
Here's what the backets look like from the bottom.
Front There is a third bolt hidden under the plastic wire cover and support in the top left. There is a plate on the other side of the frame for the bolts to go through so they are not against the frame directly.
Back (mounting in the back was a pain. I had to sneek the back and of a open box wrench through the whole below the bolts to fasten the nuts.

This was a fullfilling experience. Thanks for reading.
, I thought I would share the experience. There are other designs like NOXIOUS007's Click >here< to read. Check it out. This took me roughty 60 hours whenever I had time over 6 months. DISCLAIMER – All work in this article is DANGEROUS! Always Wear the proper safety equipment and take the correct safety precations. This post strictly a count of my experience and only intended to be informational piece. Follow it at your own risk.
I built these with the help of my friend who lent me his shop and gave me a quick welding refresher. Thanks Rich!!
Cost:
$100 Scrap Metal
$50 Tools and gear
Materials:
1 - 15' 2x2X1/4" Square Metal
1 - 15' 2" Diameter tubing 1/4" think
1 – 4'x6"x 5/16" Flat Metal
4 – 5x ½ " Grade 8 Bolts
8 – 2x ½ " Grade 8 Bolts
12 - Grade 8 ½ Locker Nuts
12 – gRade 8 ½ Washer
2 – cans of Dupli-Color Sprayon Bed Liner
Tools:
Chop saw with metal cutting blade
Mig Welder
Oxy-Acetylene Welder
Auto dimming Welding Mask
Half inch drill bits (6" for Drill press and 15 " for hand drill to drill into the frame)
Drill Press
Half inch Drill
Straight Grinder
Angle Grinder
3/4" crescent wrench and socket
Safety glasses (tires of crap falling in my eyes)
2 ton floor jack
2 x 2 ton floor stands
Final Measurements:
Front Mounts: 6"x12" (
Rear Mounts: 6"x6"
Support posts from mount to rail: 6 1/2"
Rail: 63"
tube: appr. 61"
Posts from rail to tube: 4"
Started with this. (not shown is the 5/16th piece of metal)
Cut the pieces to square metal to length (63")
Next. Wanted to see how how and far our we wanted the metal from the frame. (6" 5/16 from frame and 1/2 " below the body)
Polished the metal afterwards with a flap wheel on the angle grinder
Next we tapered the ends of the metal. Cut a triangle piece out of the metal and pinched the ends together where the trianlge was then welded. We capped the end with a piece of the 5/16 metal later on. The taper was longer in the front than the back.
It took us little while to finally figure out where we were going to mount the sliders. For the front, we chose where a cross beam connected to the frame. For the back, we measured back roughly 50" from the front and set our sights on the large hole towards the back of the frame next to the Gas tank. I cut out the mounting brackets from the 5/16 metal for the front and the back. We clamped the front mounting brackets to the welding table, heated each, one by one with the torch and slowly bent it to 90 degree.
I mocked up where the bolts would go using a piece of transparent plastic sheet (like a lamenent sheet) shped like the mounts and used the drill press to drill the holes. We put the mounts on the frame. Raised the square metal on jacks so we could adjust the height next to the car. Once we had it right I cut the support and tacked everything together. I drilled two 1/2" holes on each side of the frame one in front and one in the back then drilled holes into the mounts. (I think in hind sight I should have drilled the additonal holes in the mount before I welded them on:squW00shy:
Finally started looking like this was going to happen. Rich bent the 2" tubing but we couldn't cut it without serioulsy messing up the angle of the area we would weld agains the square tubing. We took the pieces to Steel NutZ in Temecula an easily helped us out. Thank guys.
We welded the pieces on and cut the posts at 4" then with a hole saw to get them rounded to fit against the tubing. I welded and grinded my welds back out then welded and grinded
that's what happens with an amateur welder. Finally got the rythm and finshed. We added angled pieces to go from the mount to the support for added strength. Then mounted them to the car.
Last steps was to polish and paint. I chose to use Spray on bed liner because I couldn't afford powder coating and I cringed at the thought of slipping off smooth metal and whacking my shin on the sliders.:weep:
Here is the finished product.
Here's what the backets look like from the bottom.
Front There is a third bolt hidden under the plastic wire cover and support in the top left. There is a plate on the other side of the frame for the bolts to go through so they are not against the frame directly.
Back (mounting in the back was a pain. I had to sneek the back and of a open box wrench through the whole below the bolts to fasten the nuts.
This was a fullfilling experience. Thanks for reading.
Last edited: