southernXterra

Bought an X
Location
Georgia
After seeing many videos of xterras in water and also reading through the write ups on the quest mini van alternator. My question is what is the best way to prevent from ruining the alternator on the nissan xterra? I know the obvious is avoid water, but I take my xterra off road and one thing I usually encounter is a mud hole. So, I really don't want to drop money on an alternator. I know the alternator being located at the bottom of the engine is a stupid design so what ways can I better waterproof it? Also, while on the topic what is the greatest advantage of switching to the quest alternator? What modifications are needed to accomodate the quest?
 

Jack Stilts

Skid Plates
Location
Michigan
The Quest alternator swap is relatively easy. You don't need to do anything different to the Xterra to accommodate for the bigger alternator. It just pops in.

If you get the new one from RockAuto, etc., they claim them to be "water resistant." That's the one I got when I upgraded - not a refurb, not the scrap yard edition...new.

When you do the swap, keep your stock alternator (if it's still working) and keep it as a trail spare. Take it with you in case you dunk the new one ;)
 

southernXterra

Bought an X
Location
Georgia
Not a bad idea to be honest. How hard is it to change the alternator? I haven't checked to see what it takes to change it. What year quest should I look at when on rockauto? Like which year seems to be the favorite among the majority.
 

NismoFire

Titan Swapped / SAS'd
Founding Member
Location
Smyrna, TN
99-01 Quests are the only ones that fit. Make sure to bench test the one from Rock Auto prior to installation.

It's about an hour job. Easiest way to do it is to remove the oil filter, otherwise it's an all-day job.
 

southernXterra

Bought an X
Location
Georgia
I am a noob when it comes to alternators so what is a proper way to bench test it?

99-01 Quests are the only ones that fit. Make sure to bench test the one from Rock Auto prior to installation.

It's about an hour job. Easiest way to do it is to remove the oil filter, otherwise it's an all-day job.
 

Roadwarrior

Titan Swapped / SAS'd
Founding Member
99-01 Quests are the only ones that fit. Make sure to bench test the one from Rock Auto prior to installation.

It's about an hour job. Easiest way to do it is to remove the oil filter, otherwise it's an all-day job.

You can also get them from the mercury villager, and a few others year models I believe. I don't agree that is would be an all day job, however it can be time consuming if you let it be.

The quest alternator is slightly larger and uses a different grounding screw, so if you do the swap make sure you have a screw that fits as the OEM one from the original alt will not fit.

As for prevention and safety, I was told by Luke to just soak the alt in Silicon Spray before a wheeling trip. It makes it more water resistant but water is not your main enemy, it is the mud that comes with it. The dirt and mud that gets lodged in the coils causes most of your problems, thus making your truck slowly die (if you kill an alternator [I have done so] it is a slow painful death, not short and sweet). The silicon helps keep that stuff from sticking to the alt and killing it.

Overall I would give it a 3.5 out of 10 for difficulty if 10 is replacing your engine or doing a solid axle swap. Getting the belt to the correct tension after the swap can be annoying at times.
 

southernXterra

Bought an X
Location
Georgia
Would soaking the xterra oem alternator in silicone help with its off road capabilities? My alternator in my x has 150k miles on it but still *knock on wood* going strong. So, for now the cheapest option is what I want to do. This quest swap is definitely being added to my list of future mods.
You can also get them from the mercury villager, and a few others year models I believe. I don't agree that is would be an all day job, however it can be time consuming if you let it be.

The quest alternator is slightly larger and uses a different grounding screw, so if you do the swap make sure you have a screw that fits as the OEM one from the original alt will not fit.

As for prevention and safety, I was told by Luke to just soak the alt in Silicon Spray before a wheeling trip. It makes it more water resistant but water is not your main enemy, it is the mud that comes with it. The dirt and mud that gets lodged in the coils causes most of your problems, thus making your truck slowly die (if you kill an alternator [I have done so] it is a slow painful death, not short and sweet). The silicon helps keep that stuff from sticking to the alt and killing it.

Overall I would give it a 3.5 out of 10 for difficulty if 10 is replacing your engine or doing a solid axle swap. Getting the belt to the correct tension after the swap can be annoying at times.
 

southernXterra

Bought an X
Location
Georgia
Would soaking the xterra oem alternator in silicone help with its off road capabilities? My alternator in my x has 150k miles on it but still *knock on &nbsp;wood* going strong. So, for now the cheapest option is what I want to do. This quest swap is definitely being added to my list of future mods.&nbsp;<br>
You can also get them from the mercury villager, and a few others year models I believe. I don't agree that is would be an all day job, however it can be time consuming if you let it be. <br>
<br>
The quest alternator is slightly larger and uses a different grounding screw, so if you do the swap make sure you have a screw that fits as the OEM one from the original alt will not fit.<br>
<br>
As for prevention and safety, I was told by Luke to just soak the alt in Silicon Spray before a wheeling trip. It makes it more water resistant but water is not your main enemy, it is the mud that comes with it. The dirt and mud that gets lodged in the coils causes most of your problems, thus making your truck slowly die (if you kill an alternator [I have done so] it is a slow painful death, not short and sweet). The silicon helps keep that stuff from sticking to the alt and killing it. <br>
<br>
Overall I would give it a 3.5 out of 10 for difficulty if 10 is replacing your engine or doing a solid axle swap. Getting the belt to the correct tension after the swap can be annoying at times.
 

southernXterra

Bought an X
Location
Georgia
Is there a form of silicone that I can buy to just spray on the alternator without unbolting it from my motor? Like put cardboard around it and avoid the belt and just spray the alternator? If so which spray kind seems to work the best? Also what kind of grease do you guys put in your electrical connections to make them more water tight? Might as well do this seeing how it's been monsooning where I'm at.
Yes soaking any alt in silicone will help
 

southernXterra

Bought an X
Location
Georgia
While I am at it I might as well upgrade my battery. Which batter is good to support a sound system, cb radio, and I plan to add lights later on. I was thinking an optima red top. What do you guys suggest?
 

xterror04

Site sponsor
Founding Member
Location
Carlisle, Iowa
Any spray silicone, I spray mine on the truck all the time, just try not to spray the belt if you do it's not a big deal... Most auto parts store have just plain spray silicone, wd-40 also has some now to
 

southernXterra

Bought an X
Location
Georgia
Awesome! Thanks for all the advice guys. I'm new to the offroading scene I've always been into cars and modding them such as drifting and lowering etc. So I want my rig to last as long as possible since it serves a purpose as a daily driver and offroad beast. Alright I will likely get an optima here soon. Casper in terms of the battery from sears I get the warrenty but how well does it hold up with abuse? I would prefer never having to replace my battery (until its old of course) rather than needing one on a trail and having sears replace it when I make it back. My main thing is when I go camping and have the lights etc running I like to use just the battery so I need something that has that durability factor in that it can stand being used and then abused with mud, water, dust etc whatever situation my xterra is put into.
 

lbishop

Need Bigger Tires
Location
Polk County,TN
Could throw a 12 volt deep cycle on it... I needed a battery after a local shop tried to put a quick charge on my optima red top battery (came on the truck) and blew the side out of it. I been running a die hard deep cycle for 2 or 3 yrs now lol
 

southernXterra

Bought an X
Location
Georgia
Just out of curiosity how did they manage to blow the side out of an optima?
Could throw a 12 volt deep cycle on it... I needed a battery after a local shop tried to put a quick charge on my optima red top battery (came on the truck) and blew the side out of it. I been running a die hard deep cycle for 2 or 3 yrs now lol
 

Xterraforce

<img src="http://i164.photobucket.com/albums/u7/ra
Founding Member
Location
Signal Mtn., TN
I didn't remove my oil filter. I did remove the lower alternator bracket. Overall it took about an hour including a beverage break. It will go faster if (which probably means when) I do it again.
 

bigjim247365

Anime boobs & male genitals? Sign me up!
Supporting Member
Location
Hainesville IL
Yes soaking any alt in silicone will help
personally i think this trick might be hit or miss. the coil winding in the stator and armature have a type of coating on them to prevent corrosion similar to what put on wood to finish it. plus it really the pick up brushes and diodes frying that cuase the majority of alt failures and you cant spray them unless you took the alt apart.


this is just my 2 cent worth.
 
Last edited:

TJTJ

Skid Plates
Founding Member
Location
NJ
Well, I spray the alt while its running, through all the vent holes, etc. and it gets the Si where ever the mud would be getting in.

The mud then sloughes back out.

I have ~ 400,000 miles on my OEM 2001 alternator...I have two spares...including a Mean Green. The OEM one can be taken apart and cleaned, and reassembled in about 30-45 minutes in the field if need be.

I've cleaned and re-used the OEM one from ~ 2001 to 2013...and I now have a different X....but I saved the old Alternator.

I never even took the Mean Green out of its box it came in...I've had it for umpteen years....and never needed it.


What I recommend is to clean the old one the truck came with as best as you can, spray it, and run it. Get a spare one to swap in so you can avoid the cleaning/teardown when you'd rather be wheeling.

If the original never fails, you have peace of mind....and a spare anyway.

If the orig does go south on you, you can swap in the spare, and then clean-up the old one and put it back in, or, rotate them, whatever makes sense.


I've never removed the oil filter, and the alt swap is not that bad, with the belt probably being about the only issue if you don't loosen the pulley tension first.

That ground screw is a good point...carry spares of that, as if you drop in into the mud, its gone.

I do remember some people going truck to truck to see if anyone had a spare screw.

:D
 
Last edited:

southernXterra

Bought an X
Location
Georgia
I like your option because I think the oem alternator is sufficient. I think I may grab a quest alternator as a backup. Also has anyone done a write up on how to disassemble and re-assemble their oem alternator? I would rather take a look at a write up before I dove into that myself seeing how alternators aren't cheap. At least new ones aren't.
 

TJTJ

Skid Plates
Founding Member
Location
NJ
I like your option because I think the oem alternator is sufficient. I think I may grab a quest alternator as a backup. Also has anyone done a write up on how to disassemble and re-assemble their oem alternator? I would rather take a look at a write up before I dove into that myself seeing how alternators aren't cheap. At least new ones aren't.


I did a write up with pics a few years back, I think its posted at ClubX or XterraFirma.


BTW - The charging algorithm for a gel cell, etc, is NOT THE SAME as for a std battery, and you can blow them out, or up, set them on fire, or just kill the longevity, by using the wrong charger.
 

southernXterra

Bought an X
Location
Georgia
Anyway you can copy the link off of club x? I am a member over there too but I am an active member on this forum.
I did a write up with pics a few years back, I think its posted at ClubX or XterraFirma.


BTW - The charging algorithm for a gel cell, etc, is NOT THE SAME as for a std battery, and you can blow them out, or up, set them on fire, or just kill the longevity, by using the wrong charger.
 

TJTJ

Skid Plates
Founding Member
Location
NJ
Anyway you can copy the link off of club x? I am a member over there too but I am an active member on this forum.

http://www.clubxterra.org/forums/showthread.php?t=20109


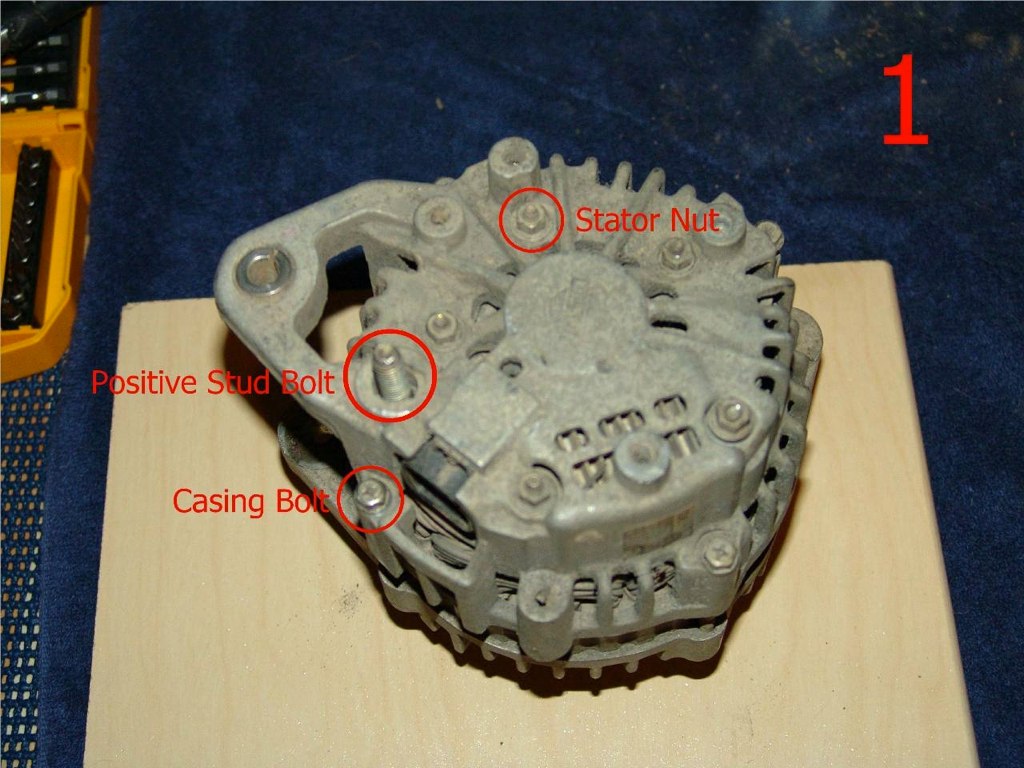
1. Remove the nut at the base of the POS stud. Remove the 5 stator nuts (8mm). Then, remove the 4 bolts (8mm) holding the front and rear cases together.


4626889018_a779360a90_o.jpg


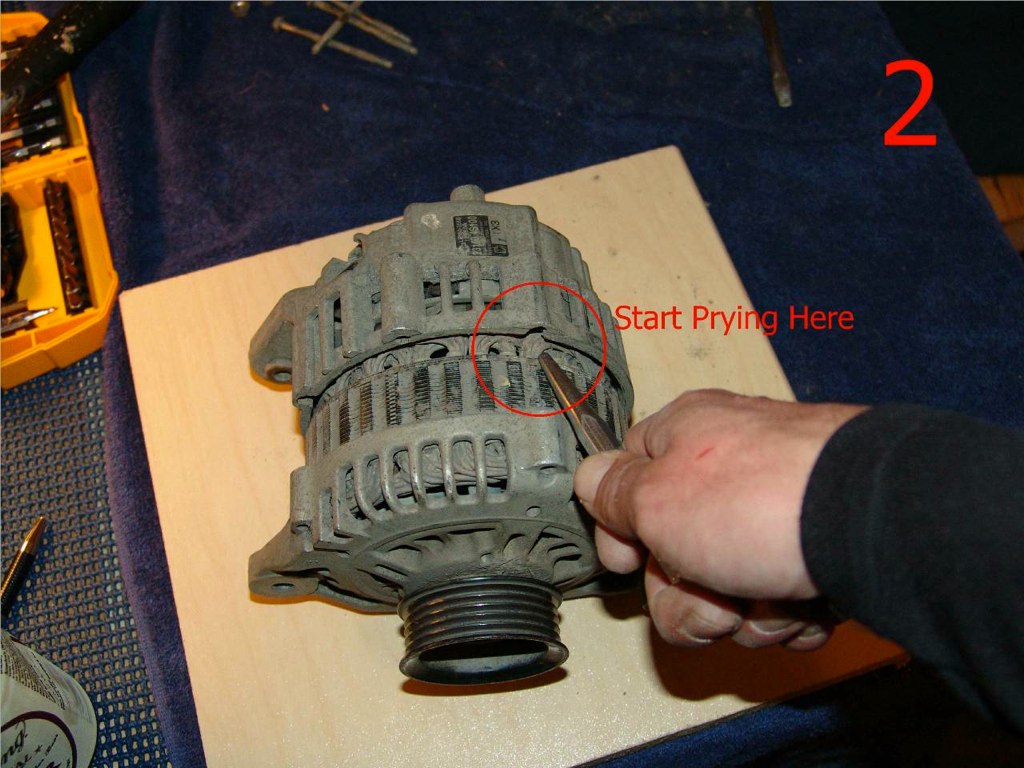
2. Use a large punch or other suitable tool to start prying the rear case from the stator. Use the four recesses in the case bolt guides to gradually separate them. As the gap increases, use a large flat head screwdriver in a twisting fashion, gradually working around until all is separated. The rear bearing is wedged into the rear case, but it will pop out.

4626281255_2354834cc6_o.jpg


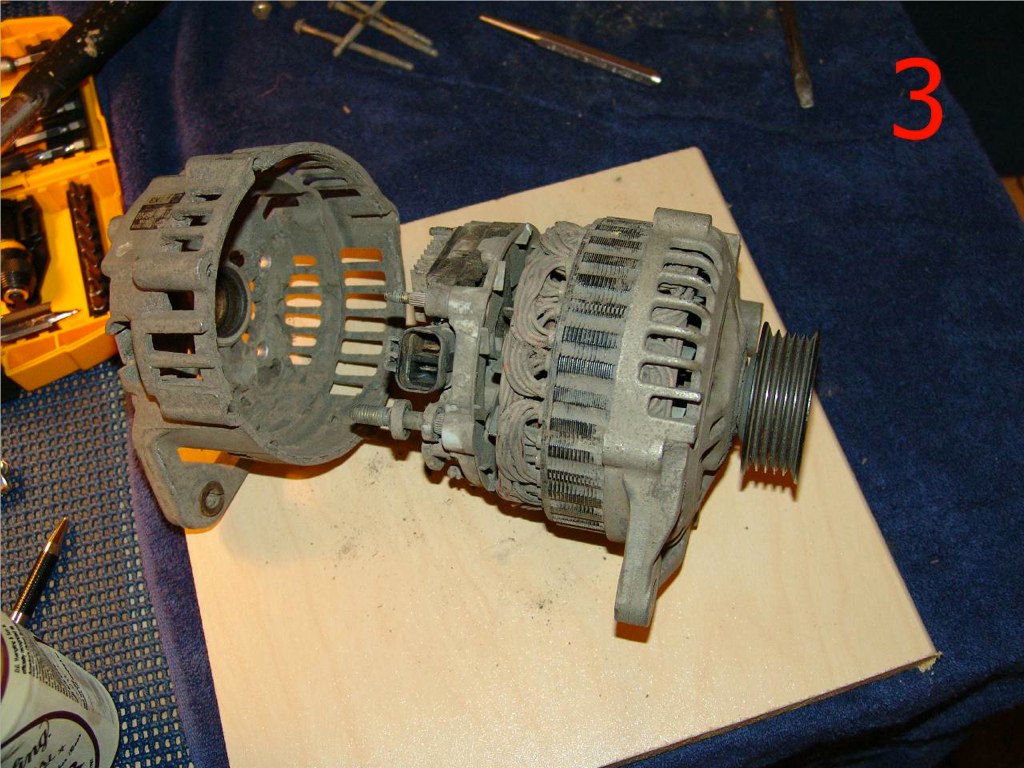
3. You’ll have 2 pieces that look like this.

4626281435_f5840fe060_o.jpg


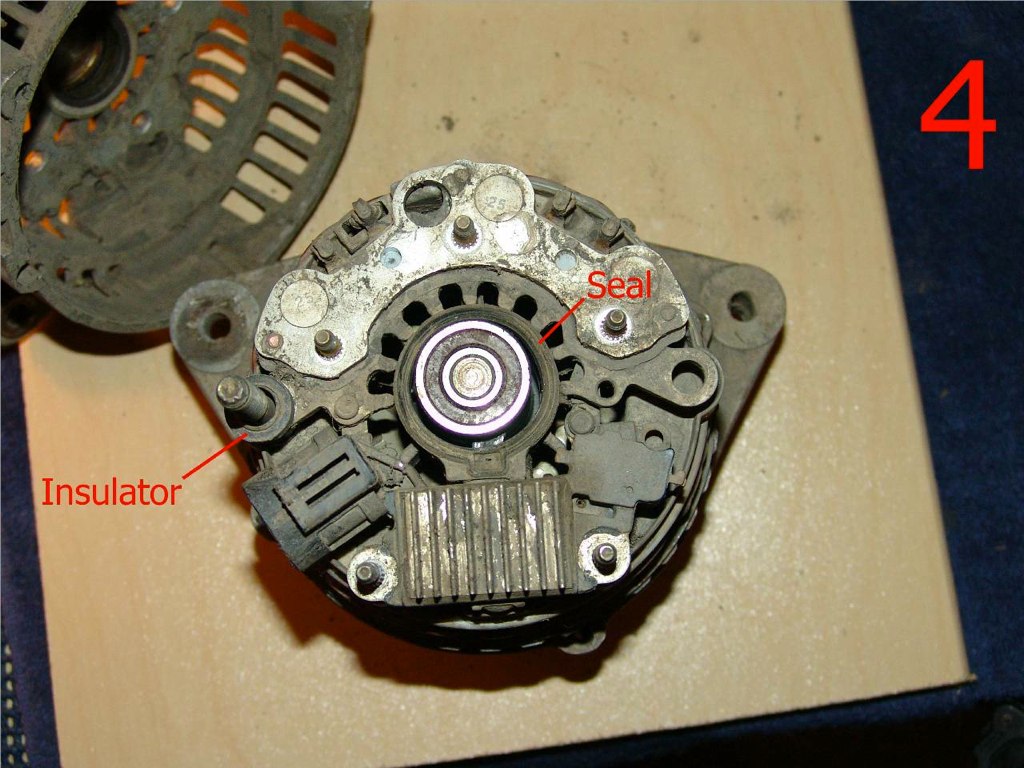
4. Notice the seal and insulator. Don’t loose these!!


4626281609_3e7f6b1c7b_o.jpg


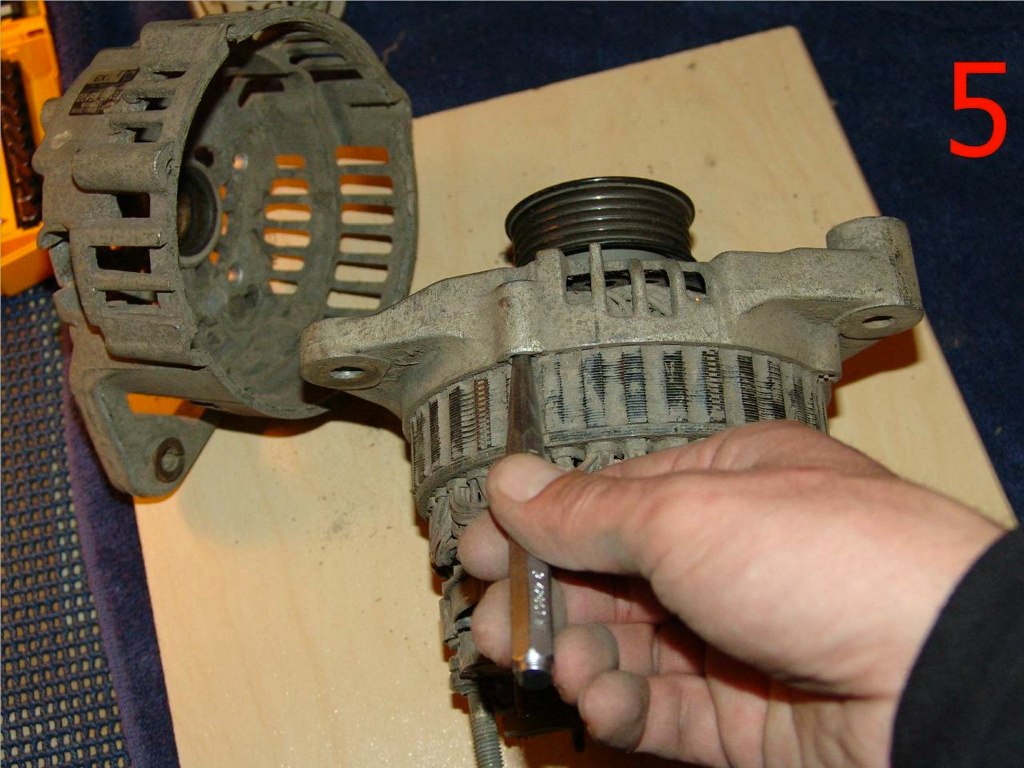
5. Start prying off the front cover in the same fashion as the rear.


4626281841_b67df0e2de_o.jpg


6. Three nice pieces.

4626282063_797d7c27c5_o.jpg


7. This is the rear shaft. Use a small gear puller to remove the rear bearing. The slip rings are what the brushes ride on to make the charging circuit.

4626890078_fa45636bed_o.jpg


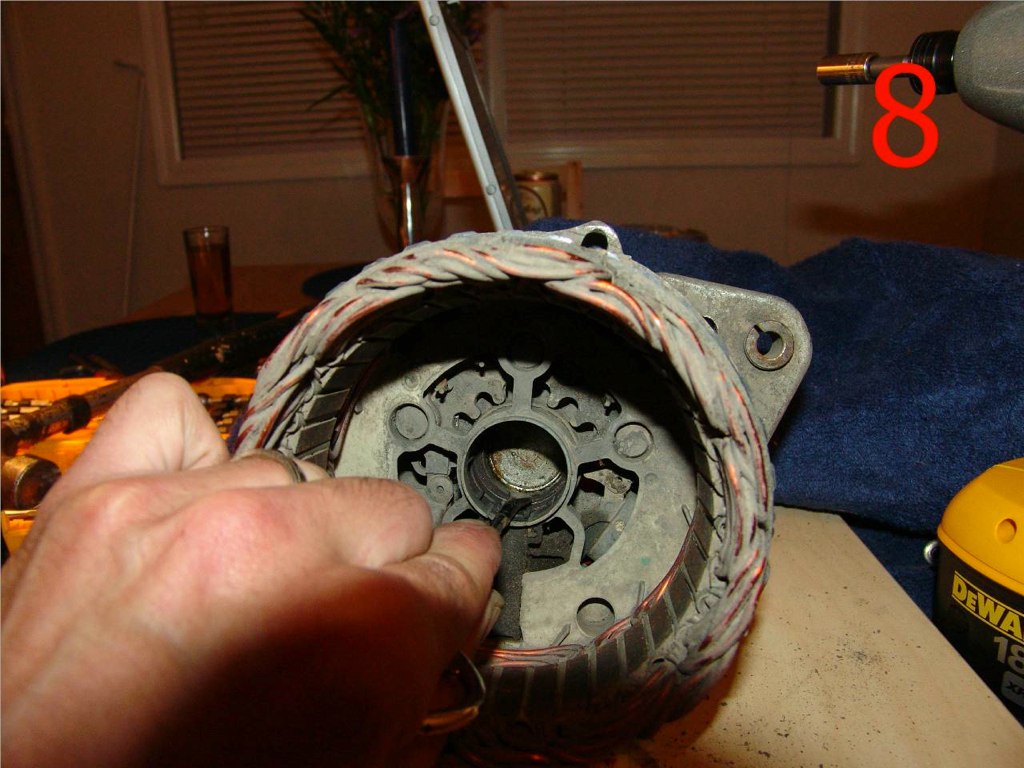
8. If the brushes are frozen in their keys, use a hooked tool or wire and some degreaser, PB Blaster, etc… to free them. They ride on springs so keep pushing and tapping on them until they pop up and move freely within their keys. This may take some time and don’t worry, they are tethered to the internal wiring and won’t fly out.

4626282475_47f8230bb7_o.jpg


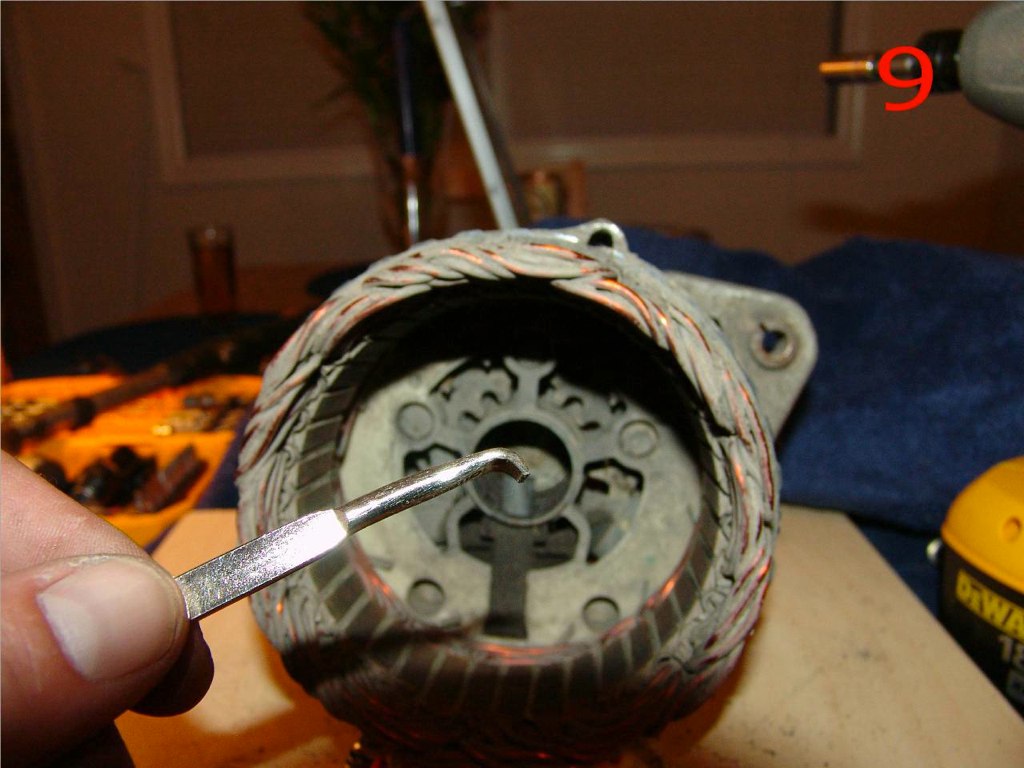
9. You can use a paint can opener, or similar device, on the brushes.

4626890430_1a1d7f8820_o.jpg


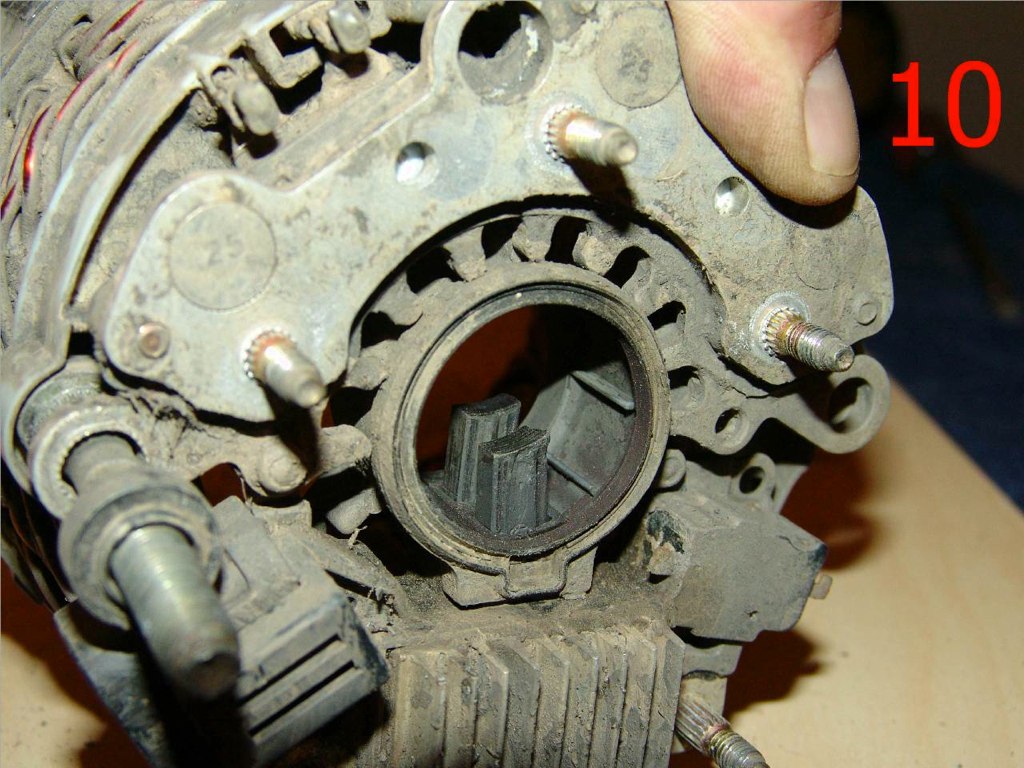
10. This is what the brushes look like when all is said and done.

4626282807_a6c9d382fe_o.jpg


11. Assemble in reverse order. Here are some hints:


12. Tap the new rear bearing on with a drift that fits just around the shaft and contacts the inner race. I use a socket for this. If the drift is any bigger it will put the force on the plastic housing or outer race. The bearing is a slight press-fit but it doesn’t take much force.


13. Don’t forget to put the seal and insulator back on!! It isolates the main positive lead from negative ground. If you forget the insulator, you’ll short the main fuse for the charging system.


14. To get the brushes back over the slip rings take a paper clip or piece of wire and push it into the hole in the rear cover. Take the hook tool and push down on the rear-most brush while pushing on the wire until the wire slides over the brush. Do the same on the second brush. Now the rear bearing will snug down into the rear cover.


15. Snug, the case bolts in a gradual, alternate manner.


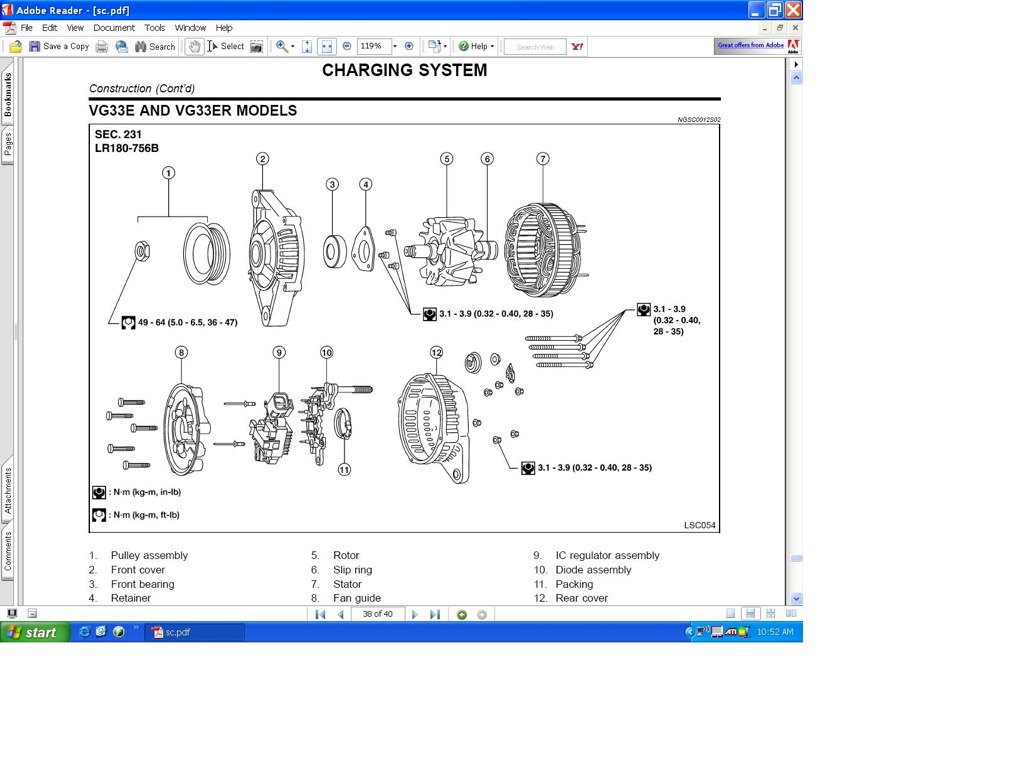
Here is a parts blow up, to help see how it all goes together, etc:

4626282987_bdce837477_o.jpg


Enjoy!

:D


My bud Mikkaa did the write up several years ago, after he and I did a whole slew of alternators on one ECXC, maybe in 2005 or so.
 

Eric P

Bought an X
Location
Colorado
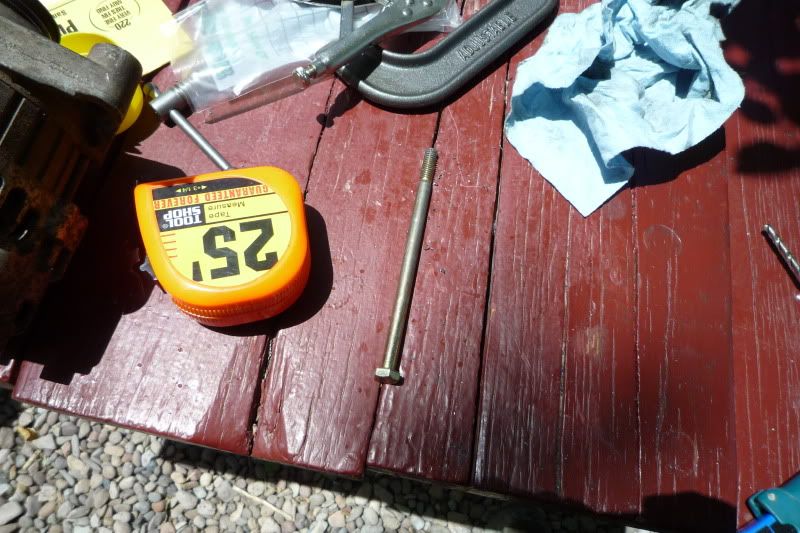
I hate these things. Went through 4 in a 3 month span before I got a mean green. But I am no longer able to filed change it without removing the radiator. Some gorilla decided to crank on the front bolt not realizing it was just a pivot point and snapped the head off. I tried to drill & tap, but failed. So I just drilled straight through and have a long bolt through the front & back. For reasons I don't understand, every so often that bolt fails in tension on the back side past the washers at the nut. And it is only tightened enough to snug the nut to the washers. Maybe the vibration is continually trying to walk the bolt forward. Since when it does fail, I know it has when there is a little ticking noise when it starts to hit the fan.
 

granitex

Skid Plates
Founding Member
Location
Columbus OH
Eric,, i have the same setup with a bolt going through the top holes instead of the one from the back and from the front and I can swap it out without pulling the rad.
 

Eric P

Bought an X
Location
Colorado
Nylock nut. No more backing out.

The nut is not backing out. I think the vibration is trying to walk the bolt out. It keeps pushing it to thr fan. The nut keeps it from going further so a tensile load is aplied an is increased untill the bolt fails at the weakest spot, which is the 1st full thread. After the bolt break, it continues to walk forward until it hits the fan.
 

TJTJ

Skid Plates
Founding Member
Location
NJ
The nut is not backing out. I think the vibration is trying to walk the bolt out. It keeps pushing it to thr fan. The nut keeps it from going further so a tensile load is aplied an is increased untill the bolt fails at the weakest spot, which is the 1st full thread. After the bolt break, it continues to walk forward until it hits the fan.


There should not be enough vibration to actually exceed the tensile strength of the bolt.

Its either something else, or, you need to balance it big time.
 

Eric P

Bought an X
Location
Colorado
Its a mean green, and i could believe that was the cause. The 1st time i thought it sheared, so i got a longer bolt to get the thread to start past the back side of the alternator. Used a few washers und barely tighten a nyloc nut. It took 2 years to break. Now i just tap the head of the bolt any time i am under the truck. It been about 1.5 years on the current bolt.
 

Silver dude

Sliders
Founding Member
Mean green is basically a stock alternator but with a rewound stator for more output. Pretty much a more expensive quest alt alternative. There are currently no bolt on options for reducing the impact the water and slop have on the alternator.

Eric, I have the same long bolt all the way thru after both of my upper bolts sheared. I'd just make sure you are using a quality grade 8 bolt.
P1020468.jpg
 
Last edited:

southernXterra

Bought an X
Location
Georgia
Wow yea I would much rather get a quest alternator than spend the prices I've been seeing for the mean green. I was hoping there was more to it for that price. Sounds like one of these aftermarket companies should jump on making an "offroad" alternator that can handle abuse. Has anyone experimented with making a special skid plate or box to seal the alternator? I'm just curious because I like taking my fairly stock xterra (for now) out offroading and I've run through some deep mud and water *knock on wood* alternator is still going but my concern is killing my alternator because this suv serves as my daily driver as well.
 

NismoFire

Titan Swapped / SAS'd
Founding Member
Location
Smyrna, TN
Wow yea I would much rather get a quest alternator than spend the prices I've been seeing for the mean green. I was hoping there was more to it for that price. Sounds like one of these aftermarket companies should jump on making an "offroad" alternator that can handle abuse. Has anyone experimented with making a special skid plate or box to seal the alternator? I'm just curious because I like taking my fairly stock xterra (for now) out offroading and I've run through some deep mud and water *knock on wood* alternator is still going but my concern is killing my alternator because this suv serves as my daily driver as well.

If it weren't for the drive belt, it'd be easy.
 
Top